


Quick Summary: Easily hem baggy jeans at home with simple tools and a proven method. This guide offers a step-by-step approach to achieve a cleaner, tailored look for your favorite denim without complicated sewing skills.
How to Hem Baggy Jeans: Proven Effortless Method
Do you love a pair of jeans but hate how they bunch around your ankles? Baggy jeans can feel comfortable, but when they’re too long or wide, they can look sloppy and shorten your legs. It’s a common problem, but thankfully, it’s an easy fix. You don’t need to be a sewing expert or spend money at a tailor to get a great result. This guide will walk you through a simple, effective way to adjust the fit of your jeans, making them look tailored and feel just right. Get ready to transform your denim!
Why Hemming Your Baggy Jeans Matters

The right fit is crucial for any piece of clothing, and jeans are no exception. Baggy jeans that are also too long can create an unflattering silhouette. The excess fabric can drag on the ground, leading to premature wear and tear, and it can make your outfits look less put-together. Hemming your jeans addresses these issues by:
- Creating a cleaner, more polished look.
- Preventing the hem from fraying or dragging.
- Improving the overall drape and silhouette of the jeans.
- Making your legs appear longer and leaner.
- Customizing the jeans to your exact height and shoe preference.
This process is about taking control of your wardrobe and making your clothes work for you. It’s a satisfying way to give old favorites a new lease on life.
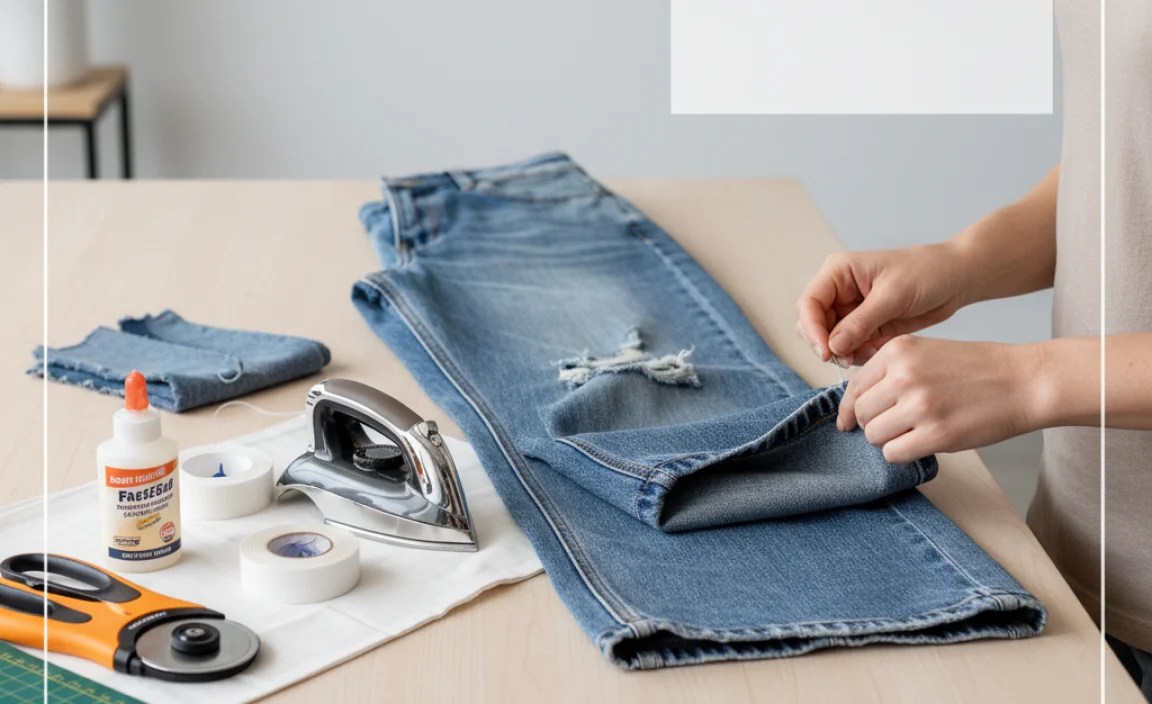
Tools You’ll Need for Effortless Hemming

Gathering the right tools before you start makes the entire process smoother and more efficient. You probably have most of these items already.
| Tool | Purpose | Why It’s Important |
|---|---|---|
| Fabric Scissors | Cutting the denim to the desired length. | Sharp scissors ensure a clean cut, preventing snags and uneven edges. Invest in a good pair specifically for fabric for best results. |
| Measuring Tape or Ruler | Accurately measuring the new hemline. | Precision is key to avoid over- or under- hemming. A flexible fabric tape measure is ideal. |
| Fabric Marker or Chalk | Marking the cut line on the denim. | Allows for precise and visible marking that won’t permanently stain your jeans. |
| Iron and Ironing Board | Pressing the hem for a crisp finish and to set temporary stitches. | A crisp hem makes the jeans look professionally done and can help guide your stitching. |
| Straight Pins | Securing the folded hem before sewing. | Keeps the fabric in place, making it easier to sew a straight line. |
| Sewing Machine (Optional, but recommended for durability) | Stitching the new hem in place. | Provides a strong, durable seam that can withstand regular wear and washing. |
| Needle and Thread (if not using a sewing machine) | Hand-sewing the hem. | Choose a thread color that matches your jeans as closely as possible. A sturdy denim needle is recommended for hand-sewing thicker fabrics. |
| Seam Ripper (Optional) | Removing the old hem if you want to preserve the original look. | Useful if you plan to replicate the original hem on your new, shorter length. |
| Damp Cloth | To remove chalk marks or test fabric marker visibility. | Ensures your markings are temporary and easily removable. |
Step-by-Step Guide: Hemming Your Baggy Jeans Effortlessly

This method focuses on a simple, no-fuss approach to shortening your jeans. We’ll aim for a clean, folded hem that looks intentional.
Step 1: Prepare Your Jeans and Workspace
First, ensure your jeans are clean. Wash and dry them as you normally would. This is important because denim can shrink after washing, and you want to hem them to their final size. Lay the jeans flat on a clean, hard surface, like a table or the floor. Smooth out any wrinkles.
Step 2: Determine the New Length
Try on the jeans and decide exactly how long you want them to be. Wear the shoes you typically wear with these jeans. Pin the jeans to the desired length to get a feel for it. It’s often best to aim for the hem to hit right at the top of your shoe, or slightly above, depending on your preference and the style of shoe. Remember, it’s easier to cut more off than to add it back, so be sure about this measurement.
Tip: If you’re unsure, start by marking a length about 1/2 inch longer than you think you want. You can always trim more later.
Step 3: Mark the Cut Line
Take off the jeans. Lay them flat again. Using your measuring tape or ruler, measure from the crotch seam down to where you pinned the hem. This is your starting point. Now, measure from that point down the leg to your desired finished hem length. Mark this spot on the outside of the pant leg with your fabric marker or chalk. Repeat this measurement on the other leg, ensuring it’s the same. You can also measure from the waist down if that feels more accurate for you. Try to keep the pants as flat and unwrinkled as possible for the most accurate marks.
You’ll want to add an allowance for your new hem. For a clean, folded hem, 1 to 1.5 inches is usually sufficient. Let’s plan for 1.5 inches to give yourself room to fold. So, if your desired finished length is X, you’ll mark Y at X + 1.5 inches.
Step 4: Cut the Excess Denim
Once you have your marks, use your fabric scissors to cut off the excess fabric. Cut straight across the leg, following your marked line. It’s a good idea to cut one leg at a time to ensure accuracy. Again, lay the pant leg flat to get the straightest cut possible. Don’t rush this step; a clean cut makes subsequent steps much easier.
Step 5: Create the New Hem Fold
This is where you’ll prepare the fabric for sewing. Take the raw edge you just cut and fold it upwards by about 1/2 inch towards the inside of the pant leg. Use your iron to press this fold flat. This creates a neat casing for your new hem. Then, fold the fabric up again, this time by the remaining allowance you left (e.g., 1 inch if you left 1.5 inches total). This second fold should cover the raw edge entirely. Press this second fold down firmly with the iron. This folded hem should now be the desired width you calculated in Step 3 and should sit at your marked final length.
Tip: For a slightly different look, you can fold up a smaller amount, like 1/4 inch, and then fold again by 1 inch, leaving a small raw edge exposed. This can mimic a “distressed” or “raw denim” look, but be aware that this can fray more over time unless secured.
Step 6: Secure the Hem with Pins
Before you sew, use straight pins to hold the folded hem in place. Insert pins perpendicular to the folded edge, spaced about every 1-2 inches. Make sure the pins go through all layers of the folded fabric and into the main part of the pant leg on the inside. This will keep the hem from shifting while you sew. Check that the hem looks even all the way around. If you notice any wobbles, adjust the pins or ironing as needed.
Step 7: Sew the New Hem
Now it’s time to secure your hem permanently. You have two main options:
Sewing Machine Method (Recommended)
Set up your sewing machine with a thread color that matches your jeans. Use a universal needle or a denim needle (size 100/16 or 110/18 is good) for best results. Stitch as close to the inner folded edge of the hem as possible. Aim for a straight line. When you reach a seam (like the side seam or inseam), you might need to manually guide the fabric or lift the presser foot briefly. Backstitch at the beginning and end of your seam to secure the threads.
Hand-Sewing Method
Thread your needle with a matching thread, knotting the end. Use a strong stitch like a backstitch or a whipstitch for durability. Start by going through the inside of the hem, securing your knot. Stitch along the folded edge, keeping your stitches as even as possible. Aim to catch just a small amount of the denim fabric with each stitch so the thread isn’t too visible from the outside. Finish by tying off your thread securely on the inside of the hem.
For a more professional look, especially if you’ve removed the original hem, you might want to try to replicate the original stitching. Many jeans have a double stitch. If your machine allows, you could try a double needle or simply sew two parallel lines of stitching.
Step 8: Final Touches and Inspection
Once you’ve sewn the hem, remove all the pins. Give the hem a final press with the iron. Check the stitching carefully to ensure it’s secure and relatively neat. Trim any loose threads. If you used a fabric marker or chalk, use a damp cloth to gently wipe away any visible marks from the outside of the jeans.
Try on your newly hemmed jeans. Do they fit perfectly? Are they the right length? If you’re happy, you’re done! If they’re still a little too long, you can repeat the folding and stitching process by folding up a little more fabric.
Alternative Methods and Considerations
While the folded hem is a classic and durable choice, other methods exist, each with its pros and cons.
1. Letting Out the Original Hem
Some jeans have extra fabric within the original hem, allowing you to let them down instead of cutting. This is ideal if your jeans are only slightly too short and you want to preserve the original finished edge. Use a seam ripper to carefully remove the old stitches, unfold the hem, and press it flat. This method is only feasible if there’s enough fabric to work with.
2. No-Sew Hem Tape
For a quick, temporary fix, fabric adhesive tape (like hemming tape) is an option. You fold the jeans to the desired length, place the tape between the layers, and press with a hot iron. The heat activates the adhesive. This is a good solution for emergency fixes or if you’re unsure about the final length.
Pros:
- Fast and requires no sewing skills.
- Can be undone if you change your mind.
Cons:
- Less durable than sewing; may come undone after washing or heavy wear.
- Can create a slightly stiffer hemline.
3. Distressed or Cut-Off Hem
For a casual, trendy look, you can simply cut off the existing hem and let the fabric fray naturally, or cut them into shorts. To encourage even fraying, you might wash them a few times. You can also manually pull threads to create a desired level of distress. Keep in mind that this requires ongoing maintenance to control fraying.
For achieving a distressed look without excessive fraying, consider cutting the jeans to your desired length and then folding the raw edge up by about 1/2 inch and pressing it well. You can then stitch this fold down, leaving a small edge of the raw denim to fray slightly over time.
This method is often favored for creating cutoff shorts from old jeans.
Maintaining Your Hemmed Jeans

Once you’ve successfully hemmed your jeans, proper care will ensure they last and maintain their new shape:
- Washing: Turn your jeans inside out before washing to protect the seams and fabric. Use a cold water cycle and a mild detergent.
- Drying: Air drying is best for preserving the fit and color of your denim. If you must use a dryer, use a low heat setting and remove them while slightly damp to prevent over-drying and shrinkage.
- Ironing: If your hem gets creased, iron it from the inside on a medium setting, using a pressing cloth if necessary for darker denim to avoid shine marks.
Troubleshooting Common Hemming Issues
Even with the best intentions, you might encounter a few snags. Here’s how to fix them:
- Uneven Hem: If you notice your hem is uneven after sewing, you might need to unpick the stitches and re-mark and recut. You can sometimes adjust this by carefully pinning and re-pressing before stitching again.
- Stitching is Visible/Messy: If the stitching shows too much or is crooked, it’s best to unpick and re-sew. Practicing on a scrap piece of denim first can help you get a cleaner line. Using thread that matches your jeans very closely (a dark indigo thread for dark jeans, for example) can hide minor imperfections.
- Jeans Still Too Long: Don’t panic! You can simply repeat the folding and sewing process, taking off another little bit of fabric.
- Jeans Too Short: This is harder to fix if you’ve cut off too much. If you left adequate seam allowance when you first hemmed, you might be able to unstitch, unfold, and re-fold to a longer length. If not, you might need to consider adding a fabric cuff or a decorative trim.
FAQ: Hemming Baggy Jeans
What is the best way to hem jeans for beginners?
The best way for beginners is to use a simple folded hem. Measure carefully, cut the excess fabric, fold it up twice (about 1/2 inch, then the rest of the allowance), press with an iron, pin, and then sew. A sewing machine makes it faster and more durable, but hand-sewing is also effective.
How much should I allow for a hem?
For a standard folded hem to prevent fraying and create a clean finish, allow 1 to 1.5 inches of fabric past your desired finished length. This allows for two folds: one for the raw edge and one to secure it.
Can I hem jeans without a sewing machine?
Yes, you absolutely can! Hand-sewing with a sturdy needle and matching thread, using a backstitch, will create a durable hem. It takes a bit more time but produces excellent results.
How do I make the hem look original?
To make the hem look original, try to preserve the original hem. If you must cut, use a seam ripper to remove the old hem, measure and cut your new length from the bottom of the original folded hem, and then reattach the original hem with a sewing machine. Alternatively, match the stitch color, width, and type (e.g., double stitch) as closely as possible to the original.
Should I wash jeans before hemming?
Yes, always wash and dry your jeans before hemming them. Denim can shrink, and you want to hem them to their final, post-wash size to avoid them becoming too short after their first proper wash.
How do I hem baggy jeans with baking soda?
Baking soda is not used for hemming jeans. It’s a cleaning agent and sometimes used in laundry to boost detergent or deodorize. Hemming involves measuring, cutting, folding, and sewing fabric. Perhaps you’re thinking of a different technique, like using it for stain removal on jeans.
How can I hem jeans if I cut too much off?
If you cut too much off, you can often add length back by creating a cuff. You can fold the bottom edge up by just about 1/4 to 1/2 inch and then fold it up again by about 1 to 1.5 inches to create a visible cuff. Stitch this cuff securely. You can


