


Struggling with jeans that have lost their shape? This guide shows you how to hem baggy jeans effortlessly, restoring their perfect fit and style. Learn simple, effective techniques to achieve a tailored look right at home, making your favorite denim wearable again.
How to Hem Baggy Jeans: A Genius Effortless Guide
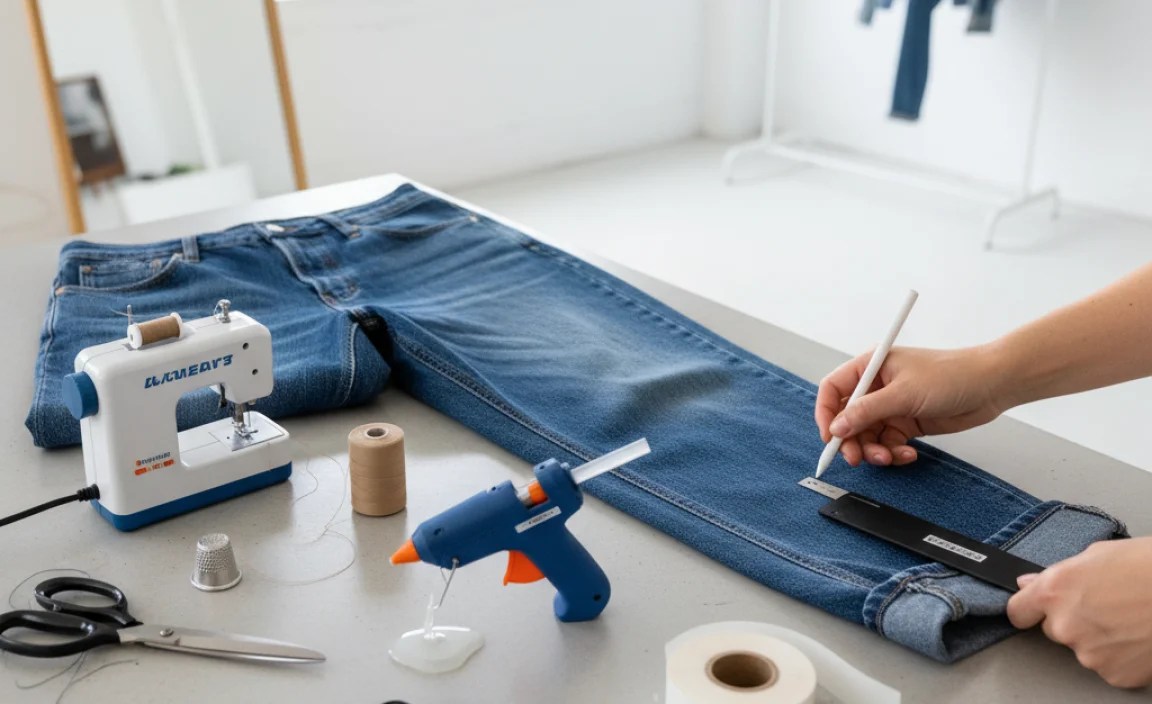
Worn-in comfort is great, but baggy jeans that have stretched out can feel less like a style choice and more like a wardrobe oops. The dreaded saggy crotch or overly wide leg can make even your favorite pair feel unstylish. Don’t worry – getting that perfect, flattering fit back is easier than you think. You don’t need to be a sewing expert to tackle this. We’ll walk you through simple, effective methods to hem your baggy jeans, giving them a fresh new lease on life. Get ready to rediscover your denim!
Why Your Jeans Get Baggy

Over time, your jeans can stretch out for a few common reasons. The denim fabric itself, especially if it has a high cotton content, naturally loosens with wear and washing. Heat from dryers can also break down elastic fibers in stretch denim, causing them to lose their shape permanently. Movement throughout the day – sitting, bending, and walking – gradually pulls the fibers apart. Sometimes, simply buying jeans that were a bit too loose to begin with means they’ll eventually settle into a baggier fit than desired. Understanding this helps us know why hemming is such a useful skill.
Choosing Your Hemming Method
There are several ways to hem your jeans, each with its pros and cons. The best method for you depends on your skill level, the tools you have, and the look you’re going for. We’ll cover the most popular and effective ways to get that perfect fit again.
Method 1: The No-Sew Hem
This is the quickest and easiest method, perfect for a temporary fix or if you’re hesitant to use a needle and thread. It’s also great for thicker denim that might be tough to sew through manually.
What You’ll Need:
- Fabric glue (like a strong fabric adhesive or hemming tape)
- Sharp scissors
- Measuring tape or ruler
- Fabric chalk or a washable marker
- Iron (optional, but recommended for some glues/tapes)
- A friend to help with measurements (optional)
Step-by-Step No-Sew Hem:
- Try On Your Jeans: Put on the jeans you want to hem. Stand in front of a mirror and decide how much length you want to remove. Pin or mark the new hemline on one leg where you want the jeans to end. Make sure the jeans are sitting on your natural waistline for an accurate measurement.
- Measure and Mark: Take off the jeans. Lay them flat on a hard surface. Measure from the marked hemline down – you’ll want to add about 1 inch (2.5 cm) for the fold. Mark this new fold line clearly with fabric chalk or a washable marker on the inside of the leg. Repeat this precise measurement and marking on the other leg, ensuring it matches exactly.
- Cut the Excess Fabric: Carefully cut off the excess fabric below your marked fold line. Aim for a straight line across the leg.
- Apply Fabric Glue or Tape: Fold the raw edge of the fabric upwards to meet your marked fold line. This creates a clean, single fold. Now, apply a generous amount of fabric glue along the raw edge that’s now folded up, or carefully place your hemming tape along this folded edge. Ensure you have an even layer.
- Press and Seal: If you’re using fabric glue, you might need to clamp the edges together or let it dry according to the product instructions. For hemming tape, place a pressing cloth over the folded fabric and iron it on a medium-hot setting (check your tape’s recommendations) to activate the adhesive. Hold the iron in place for several seconds to ensure a strong bond.
- Let it Cure: Allow the glue or tape to fully cure before wearing or washing the jeans. This is crucial for a durable hold. Check the product instructions for the recommended curing time, which can range from a few hours to 24 hours.
Pros of No-Sew Hemming:
- Extremely fast and requires no sewing skills.
- Great for beginners or quick fixes.
- Can be undone if you change your mind (though some glues are permanent).
- Works well on a variety of denim weights.
Cons of No-Sew Hemming:
- May not be as durable as a sewn hem, especially after multiple washes.
- The folded edge might be visible from the outside depending on the fabric and how neatly it’s done.
- Some fabric glues can stiffen the hem area.
Method 2: The Basic Hand-Sewn Hem
This method still requires minimal supplies but offers a more durable and professional-looking finish. It’s a fantastic step up from no-sew and is quite manageable for beginners.
What You’ll Need:
- Sharps scissors
- Measuring tape or ruler
- Fabric chalk or a washable marker
- Straight pins
- Sewing needle
- Thread that matches your jeans (or a contrasting color for a visible stitch detail)
- Iron and ironing board
Step-by-Step Hand-Sewn Hem:
- Measure and Mark: As with the no-sew method, try on your jeans to determine the desired length. Mark the hemline with chalk or a marker. Then, measure about 1.5 inches (approx. 3.8 cm) below this line and mark your fold line. This extra allowance gives you space for a double fold, creating a more finished edge.
- Create the Double Fold: Fold the raw edge of the fabric up to meet your marked fold line. Press this fold flat with an iron. Then, fold that entire folded edge up again, so the raw edge is completely enclosed within the second fold. This is your final hem. Pin the hem in place securely all the way around, ensuring it’s flat and even.
- Thread Your Needle: Cut a piece of thread about 18-24 inches long and thread your needle. Tie a knot at the end of the thread to secure it. For extra strength, you can use a double strand of thread.
- Start Sewing: Begin sewing on the inside of the folded hem, about 1/4 inch from the outer edge. Use a simple stitch like a blind stitch or a whipstitch.
- Blind Stitch: For an almost invisible hem. Make a small stitch through the folded hem, then catch just one or two threads of the main jean fabric, then back to the folded hem. Keep stitches small and consistent.
- Whipstitch: A more visible but secure stitch. You will pass the needle through the folded hem and then over to the main jean fabric and back. This creates a visible decorative line if using a contrasting thread.
- Continue Sewing: Work your way around the entire leg, maintaining an even tension and consistent stitch length. Reposition pins as you go.
- Finish Off: When you reach the starting point, secure your thread by making a few small stitches on top of each other and tying a knot close to the fabric. Trim any excess thread.
- Press the Hem: Give the finished hem a good press with your iron to ensure it lies flat and crisp.
- Repeat for the Other Leg: Ensure the second leg is hemmed to the exact same length and width as the first.
Pros of Hand-Sewn Hemming:
- Durable and long-lasting.
- Can achieve a very neat and professional finish.
- Uses basic, accessible tools.
- Allows for precise control over stitch type and appearance.
Cons of Hand-Sewn Hemming:
- Takes more time and patience than no-sew methods.
- Requires some basic sewing dexterity.
- May be challenging for very thick or bulky denim.
Method 3: The Machine-Sewn Hem
If you have a sewing machine, this is the most efficient and durable way to hem your jeans. It’s ideal for achieving a factory-quality finish.
What You’ll Need:
- Sewing machine
- Matching or contrasting thread
- Sharp scissors
- Measuring tape or ruler
- Fabric chalk or washable marker
- Straight pins
- Iron and ironing board
- Universal sewing machine needle (consider a denim needle for thicker fabrics)
Step-by-Step Machine-Sewn Hem:
- Prepare Your Jeans: Try on your jeans and mark the desired hem length accurately. Take them off and lay them flat. Measure and mark the fold line about 1.5 inches below the hemline for a double fold.
- Create the Double Fold: Fold the raw edge up to the fold line and press. Then, fold that edge up again to enclose the raw edge, creating your final hem. Pin securely in place.
- Set Up Your Sewing Machine: Ensure you have the correct needle (a denim or universal needle size 14 or 16 is good) and matching thread in both the top and bobbin. Set your stitch length to a standard 2.5-3mm for durability.
- Start Sewing: Begin sewing at the inseam (the inner seam) of the leg to hide your starting knot. Lower the presser foot onto the hem.
- Sew the Hem: Sew all the way around the leg, following the edge of the folded hem. Keep your speed consistent and ensure even fabric feeding. Use the pins as guides, removing them just before the needle reaches them.
- Backstitch to Secure: When you complete the circle and reach your starting point, backstitch a few stitches (sew in reverse for a few stitches) to secure the thread firmly.
- Trim Threads and Press: Trim any loose threads. Press the hem flat with your iron.
- Repeat for the Other Leg: Ensure the second leg is an exact match to the first.
Pros of Machine-Sewn Hemming:
- Fastest method for a professional finish.
- Very durable and long-lasting.
- Creates a clean, factory-like appearance.
- Ideal for handling multiple pairs of jeans.
Cons of Machine-Sewn Hemming:
- Requires access to a sewing machine.
- Can be challenging to maneuver the thick seams of jeans under the presser foot.
- May require a stronger needle for very thick denim.
Dealing with Different Denim Types

Not all denim is created equal, and the type of fabric can influence your hemming approach.
Stretch Denim vs. Non-Stretch Denim
- Stretch Denim: This denim contains elastane or Lycra, making it more flexible. When hemming, it’s crucial to avoid stretching the fabric as you work, especially if using no-sew methods or sewing by hand. This can lead to a wavy or uneven hem. Ensure you press your folds firmly.
- Non-Stretch Denim: This is traditional, rigid denim. It’s easier to work with as it holds its shape well. You might find it tougher to sew through, making a denim needle for your machine highly recommended.
Raw Denim
Raw denim is unwashed and untreated. Many enthusiasts prefer to hem raw denim themselves for a personalized fade profile. The process is the same, but be aware that raw denim can shrink, especially in the wash. It’s wise to wash them first (following care instructions, as some raw denim requires specific care like soaking) and then hem them to their final desired length, accounting for any expected shrinkage. Always refer to reliable guides on how to wash raw denim to preserve its unique characteristics.
Maintaining Your Hemmed Jeans

Washing & Drying
To keep your freshly hemmed jeans looking their best and to prevent future stretching, follow these washing guidelines:
- Wash Less Often: Only wash your jeans when they are truly dirty. Over-washing can lead to wear and tear, and can impact the integrity of your hem.
- Wash Inside Out: This protects the outer surface of the denim and minimizes friction on the seams.
- Use Cold Water: Hot water can break down fibers and cause shrinkage or stretching. Cold water is gentler.
- Gentle Detergent: Opt for mild, eco-friendly detergents. Harsh chemicals can damage denim.
- Air Dry: This is the golden rule for keeping jeans in shape. Hang them over a drying rack or clothesline. Avoid direct sunlight for prolonged periods if you want to prevent fading.
- Avoid the Dryer: The heat from a dryer is the enemy of denim elasticity and can cause shrinkage. If you must use a dryer for a quick dry, use a low heat setting and remove them while still slightly damp to finish air drying.
Repairing a Fallen Hem
Even with careful wear, hems can sometimes loosen. If your hem starts to fray or come undone:
- Inspect the Damage: See if the stitching has come loose or if the fabric has torn.
- Re-sew or Re-glue: If stitches have fallen out, you can easily hand-sew or machine-sew them back in place. If the fabric itself is worn, you might need to trim a little off the bottom and re-hem, or use fabric glue for a quick fix.
- Consider a Higher Hem: If the fabric at the original hem is too damaged to repair, you can always opt to hem them a little shorter.
Table: Hemming Method Comparison
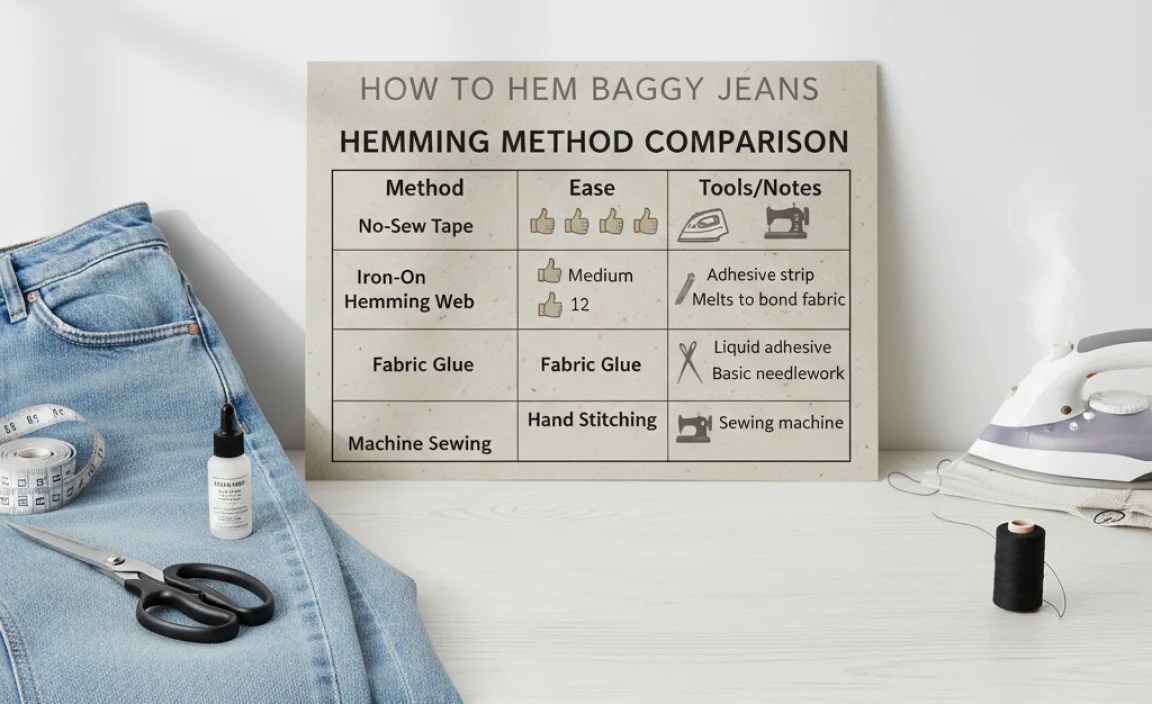
Here’s a quick comparison to help you choose the best hemming method for your needs:
| Feature | No-Sew Hem | Hand-Sewn Hem | Machine-Sewn Hem |
|---|---|---|---|
| Speed | Very Fast | Moderate | Fast |
| Durability | Moderate (machine wash can reduce lifespan) | High | Very High |
| Skill Level | Beginner | Beginner to Intermediate | Intermediate |
| Tools Required | Fabric glue/tape, scissors, marker | Needle, thread, scissors, marker, pins | Sewing machine, thread, scissors, marker, pins |
| Appearance | Can be good, sometimes visible fold | Neat, can be invisible (blind stitch) or decorative | Professional, factory-like |
| Best For | Quick fixes, very thick denim, first-time hemmers | Durable results, control over stitch, no machine access | Efficiency, long-term durability, multiple pairs |
Frequently Asked Questions About Hemming Jeans
Q1: How much fabric should I leave for hemming?
For a standard double fold hem, it’s recommended to leave about 1 to 1.5 inches (2.5 to 3.8 cm) of excess fabric below your desired final hemline. This allows for a neat, enclosed edge that’s durable.
Q2: Can I hem jeans with a rolled or cuffed look permanently?
Yes! If you prefer a permanent cuff, you can create a wider double or even triple fold hem. Sew along the very bottom edge of the folded cuff to secure it in place permanently. This requires more fabric allowance than a standard hem.
Q3: What’s the best way to hem skinny or tight jeans?
For skinny jeans, the process is the same but requires extra care to avoid stretching. A machine-sewn hem is often best for durability and a clean finish. If hand-sewing, use a strong stitch and maintain even tension.
Q4: My jeans have a faded hemline. How can I maintain that look after hemming?
If you want to preserve the original faded hemline, you can carefully cut above the existing hem, then use fabric glue or iron-on hemming tape to fold the fabric up to the desired length without creating a new visible seam. For a more secure method, you might need to carefully cut along the seam line of the original hem, remove it, and then reattach a new hem using a matching stitch that mimics the original appearance. Some people also use specialized fabric markers or dyes to recreate wear patterns.
Q5: How do I ensure both legs are hemmed to the same length?
The simplest way is to measure from the crotch seam down to where you want the hem to end.
.lwrp.link-whisper-related-posts{
margin-top: 40px;
margin-bottom: 30px;
}
.lwrp .lwrp-title{
}.lwrp .lwrp-description{
}
.lwrp .lwrp-list-container{
}
.lwrp .lwrp-list-multi-container{
display: flex;
}
.lwrp .lwrp-list-double{
width: 48%;
}
.lwrp .lwrp-list-triple{
width: 32%;
}
.lwrp .lwrp-list-row-container{
display: flex;
justify-content: space-between;
}
.lwrp .lwrp-list-row-container .lwrp-list-item{
width: calc(25% – 20px);
}
.lwrp .lwrp-list-item:not(.lwrp-no-posts-message-item){
max-width: 150px;
}
.lwrp .lwrp-list-item img{
max-width: 100%;
height: auto;
object-fit: cover;
aspect-ratio: 1 / 1;
}
.lwrp .lwrp-list-item.lwrp-empty-list-item{
background: initial !important;
}
.lwrp .lwrp-list-item .lwrp-list-link .lwrp-list-link-title-text,
.lwrp .lwrp-list-item .lwrp-list-no-posts-message{
}@media screen and (max-width: 480px) {
.lwrp.link-whisper-related-posts{
}
.lwrp .lwrp-title{
}.lwrp .lwrp-description{
}
.lwrp .lwrp-list-multi-container{
flex-direction: column;
}
.lwrp .lwrp-list-multi-container ul.lwrp-list{
margin-top: 0px;
margin-bottom: 0px;
padding-top: 0px;
padding-bottom: 0px;
}
.lwrp .lwrp-list-double,
.lwrp .lwrp-list-triple{
width: 100%;
}
.lwrp .lwrp-list-row-container{
justify-content: initial;
flex-direction: column;
}
.lwrp .lwrp-list-row-container .lwrp-list-item{
width: 100%;
}
.lwrp .lwrp-list-item:not(.lwrp-no-posts-message-item){
max-width: initial;
}
.lwrp .lwrp-list-item .lwrp-list-link .lwrp-list-link-title-text,
.lwrp .lwrp-list-item .lwrp-list-no-posts-message{
};
}


