


Quick Summary: Effortlessly hem your boyfriend jeans for a perfect fit without sewing using fabric glue or hemming tape. This guide provides simple, clear steps to achieve a clean, professional-looking cuff that looks great and lasts.
How to Hem Boyfriend Jeans Effortlessly
Those perfectly relaxed boyfriend jeans can sometimes end up a little too relaxed in length, tripping you up or just looking a bit sloppy. It’s a common style dilemma, but getting them to the right length doesn’t require hours at a sewing machine or a trip to the tailor. You can achieve a neat, custom hem right at home, quickly and easily. Get ready to give your favorite jeans a new lease on life with a polished finish that still keeps that casual vibe.
This guide will walk you through the simplest methods to get your boyfriend jeans looking their best, no sewing skills needed. We’ll cover the essential tools, straightforward techniques, and some handy tips to ensure your hem stays put and looks fantastic. Let’s get started on making those jeans fit you perfectly.
Why Hemming Your Boyfriend Jeans Matters

Boyfriend jeans are designed for a relaxed fit, but an improperly hemmed pair can undermine the entire look. Too long, and they can overwhelm your frame, making you appear shorter or creating an untidy appearance. The right length elongates your legs and balances the casual, laid-back style that boyfriend jeans are known for. A well-executed hem can completely transform how your jeans look and feel, making them a much more versatile part of your wardrobe. It’s about achieving that “effortless” look with intentional detail.
Understanding Your Jeans and Your Goal

Before you grab any tools, take a moment to consider your boyfriend jeans. Are they a lightweight denim or a heavier material? Do they have a distressed finish or clean edges? Your goal is to hem them in a way that complements their existing style. For most boyfriend jeans, a slightly cropped or ankle-length hem works best, allowing them to showcase your shoes. This is often referred to as a “cuffed” or “no-show” hem, depending on your preference.
Choosing Your Hemming Method
There are several fantastic ways to hem your boyfriend jeans without a sewing machine. The most popular and beginner-friendly involve fabric adhesives or special hemming tapes. We’ll focus on two primary, no-sew methods:
- Fabric Glue
- Hemming Tape (Iron-on or Fusible Web)
Each method offers a durable and clean finish, but they have slight differences in application and permanence. Understanding these differences will help you choose the best option for your project and desired outcome.
Method 1: Hemming with Fabric Glue

Fabric glue is an excellent option for a quick, secure hem that’s also relatively flexible. It’s ideal for denim as it creates a strong bond that can withstand washing and wearing. For the best results, choose a fabric glue specifically designed for textiles, as these are formulated to be strong, flexible, and often water-resistant.
What You’ll Need:
- Your boyfriend jeans
- Fabric glue (e.g., Aleene’s Fabric Fusion, Gorilla Fabric Glue)
- Measuring tape or ruler
- Fabric scissors (optional, only if you need to trim significant length)
- Iron and ironing board (optional, for a crisper fold)
- Pins or fabric clips
- A flat, clean surface (like a table or floor)
- Newspaper or a protective cloth (to prevent glue from seeping through)
Step-by-Step Guide:
- Prepare Your Jeans: Wash and dry your boyfriend jeans without fabric softener beforehand. Fabric softener can interfere with the glue’s adhesion. Lay your jeans flat on a clean surface, smoothed out to remove wrinkles.
- Determine the Desired Length: Try on your jeans and decide where you want the hem to fall. Use a measuring tape or ruler to measure from the crotch seam down to where you want the bottom of the hem to be. Mark this point on the inseam with a piece of chalk or a washable fabric pen. Remember to account for the amount you’ll fold up. For a typical boyfriend jean hem, you might want to fold up 1-2 inches.
- Create the Fold:
- Option A (Simple Fold): Fold the bottom of the jean leg up by your desired hem allowance (e.g., 1.5 inches). Smooth it out carefully so there are no major creases except for the one you just made at the top of the fold.
- Option B (Trim and Fold): If your jeans are significantly too long and you want a cleaner edge before gluing, you can carefully trim off the excess length, leaving about 2 inches for your hem. Then, fold up that 2-inch allowance.
Tips for Using Fabric Glue:
- Test First: Always test the fabric glue on a small, inconspicuous area or a scrap piece of denim to ensure it dries clear and doesn’t discolor the fabric.
- Work in Sections: Don’t try to glue the entire hem at once. Work in manageable sections to prevent the glue from drying out before you can press the fabric down.
- Even Application: Aim for a thin, consistent line of glue. Too much can create a stiff or lumpy hem.
- Patience is Key: Allow ample drying time. Rushing the process can lead to a hem that doesn’t hold.
Method 2: Hemming with Iron-On Hemming Tape

Iron-on hemming tape, also known as fusible web or hemming tape, is another excellent no-sew option. It uses heat from an iron to melt the adhesive in the tape, bonding the fabric layers together. This method often creates a very clean and professional-looking hem.
What You’ll Need:
- Your boyfriend jeans
- Iron-on hemming tape (available in fabric stores or online)
- Measuring tape or ruler
- Scissors
- Iron and ironing board
- Pins or fabric clips
- A damp cloth (optional, for some tape types)
Step-by-Step Guide:
- Prepare Your Jeans: As with fabric glue, ensure your jeans are clean and free of fabric softener. Lay them flat and smooth out any wrinkles.
- Determine and Mark Length: Try on your jeans and mark your desired finished length using a measuring tape. Add the desired hem allowance (usually 1 to 2 inches for boyfriend jeans) and mark this point.
- Fold and Press (Initial Fold): Fold the bottom of the jean leg up to your desired hem allowance. Press the fold with your iron to create a temporary crease. If you are aiming for a very clean finish, you might fold the raw edge of the denim inwards (towards the inside of the pant leg) by about ½ inch, then press this under-fold. Then, fold up the entire hem allowance.
- Cut the Hemming Tape: Cut a piece of hemming tape to the length of your hem. Ensure it’s long enough to go all the way around.
- Insert Hemming Tape: Carefully unpin or unclip your folded hem. Slide the hemming tape between the raw edge of the fabric and the inside of the folded hem. The tape should sit squarely in the folded section.
- Pin or Clip in Place: Re-pin or reclip the hem to hold its position with the hemming tape inside. Make sure the tape won’t be visible from the outside of the jean leg.
- Iron the Hem: This is the most critical step. Follow the manufacturer’s instructions for your specific hemming tape carefully. Generally:
- Set your iron to the temperature recommended for denim (usually medium-high, cotton setting), without steam.
- Place a dry cloth or a damp cloth over the hemmed area if your tape instructions recommend it.
- Press the iron firmly onto the hemmed section for the recommended amount of time (usually 5-15 seconds).
- Lift the iron and move to the next section, overlapping slightly with the previous one.
- Allow to Cool: Let the hem cool completely before touching it or moving the jeans. Heat-activated adhesives need time to bond securely.
- Check the Bond: Gently tug at the hem to ensure it’s secure. If any part feels loose, repress that section.
Tips for Using Hemming Tape:
- Read Instructions: Every brand of hemming tape might have slightly different instructions regarding temperature, time, and whether to use steam or a damp cloth. Always follow the package directions.
- Pre-wash: Always pre-wash your jeans and the hemming tape (if it’s washable) to remove any sizing or chemicals that could prevent a good bond.
- Ironing Surface: Ensure your ironing board cover is clean and smooth. Ironing over debris can transfer marks to your jeans.
- Use a Pressing Cloth: A pressing cloth (like a thin cotton cloth or a piece of scrap fabric) can protect your jeans and iron from direct contact, especially with certain types of tape or if you’re worried about scorching.
Comparing No-Sew Hemming Methods
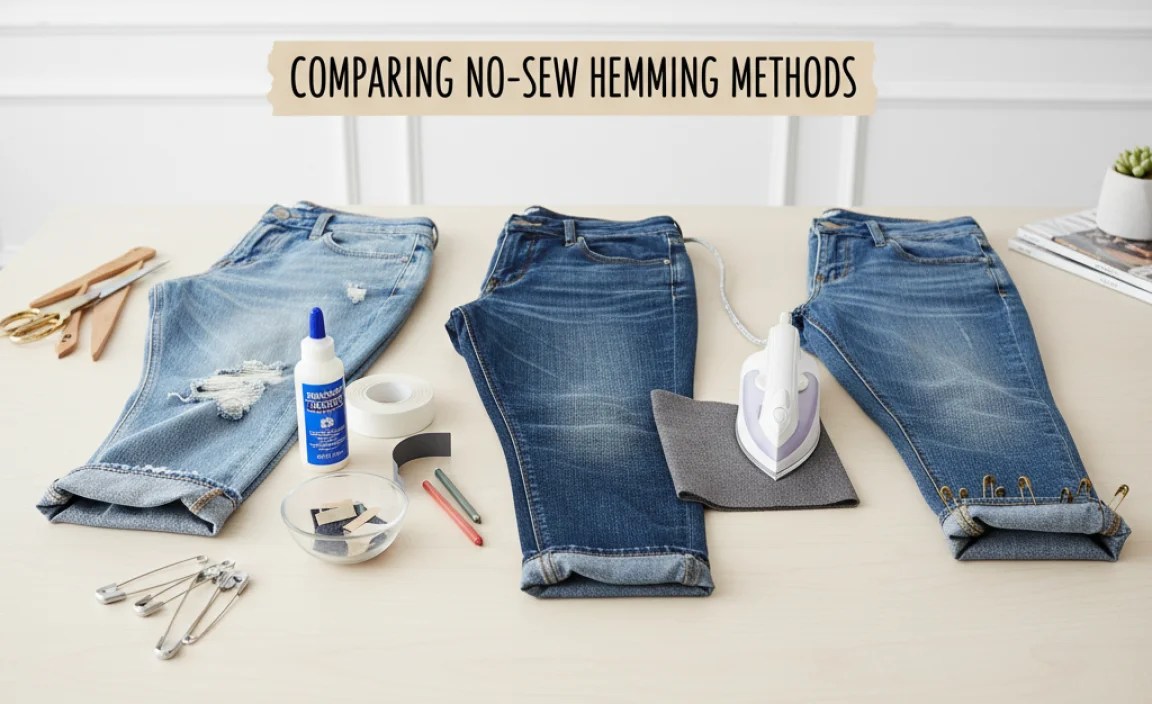
Choosing between fabric glue and hemming tape often comes down to personal preference, the type of fabric, and the desired finish. Here’s a quick comparison to help you decide:
| Feature | Fabric Glue | Iron-On Hemming Tape |
|---|---|---|
| Ease of Use | Simple application, no iron needed if you’re okay with no crease. Requires drying time. | Requires an iron. Quick bonding process once ironed. Mistakes can be harder to fix once bonded. |
| Durability | Very durable, can be slightly flexible. Depends heavily on glue quality and application. | Highly durable and creates a strong, crisp bond. |
| Finish/Look | Can sometimes create a slightly stiffer edge or a subtle ridge. May be less visible on thicker denims. | Generally creates a very clean, flat, and professional-looking hem, similar to a sewn hem. | Permanent once cured. Usually washable and dryable. | Permanent once bonded. Washable and dryable. Consider professional dry cleaning if recommended by tape manufacturer. |
| Ideal For | Quick fixes, thicker denims, achieving a lived-in look, when an iron isn’t available. | Crisp, clean hems, when a professional look is desired, thinner to medium-weight denims. |
Additional Hemming Tips for Boyfriend Jeans
Beyond the basic steps, a few extra tips can elevate your hemming project:
- Consider the Shoe: Always hem your jeans with the type of shoes you intend to wear them with in mind. This ensures the length is perfect for your chosen footwear.
- Double Fold for a Clean Finish: To hide the raw edge entirely, create a double fold. Fold the hem up by your desired allowance (e.g., 1.5 inches). Then, fold the raw edge inside itself so it’s enclosed within the cuff you just made. This is how most professional hems are done. It might require slightly more hemming tape or glue.
- Embrace the Raw Hem (with a Twist): For an even more casual look, you can cut the jeans to the desired length and then fray the edges deliberately. To prevent excessive fraying, you can apply a small amount of fabric glue or hemming tape to the inside of the leg, just above the cut edge, to create a stopping point for the fraying. For more on creating a perfect raw hem, check out resources on denim finishing techniques from textile design departments, such as those found on university extension websites or fashion design program guides.
- Distressed Jeans and Hems: If your boyfriend jeans are already distressed, you might want your hem to match this vibe. A slightly messier or even a frayed hem can work perfectly. You can achieve a frayed hem by cutting your desired length, then carefully pulling out threads from the cut edge.
- Test on Similar Fabric: If you’re unsure about how a glue or tape will behave, test it on a scrap of similar denim or an old garment first.
When to Consider Sewing (Even for Beginners)
While these no-sew methods are fantastic, there are times when a simple stitch might be beneficial, even for beginners. If you’re aiming for the absolute cleanest, most durable finish, especially on very lightweight denim or if you plan on very frequent washing and wear, a simple hand-stitched hem can provide extra security. You can learn basic hand-stitching techniques from resources like the Better Homes & Gardens guide to hand sewing stitches. Basic stitches like a running stitch or a whipstitch are relatively easy to learn and can reinforce a no-sew hem or be used on their own for a quick fix.
Troubleshooting Common Hemming Issues
Even with the best intentions, you might run into a minor hiccup. Here’s how to fix them:
- Hem Falling Down: This usually means the glue hasn’t fully cured or the hemming tape didn’t bond properly. Reapply glue, ensuring full coverage and cure time, or re-iron the tape, ensuring adequate heat and pressure.
- Glue Seeping Through: If you used too much glue, it might create a stiff line or even be visible on the outside. For minor seepage, you might be able to carefully push it back in with a toothpick while wet. Once dried, it’s harder to fix, but it might be less noticeable with wear. Try to be very precise with application next time.
- Uneven Hem: This can happen if the fabric wasn’t smoothed correctly or the fold wasn’t even. For fabric glue, you might be able to carefully peel it apart and re-glue. For hemming tape, if it hasn’t fully bonded or cooled, you might be able to gently peel it back (carefully, as you might damage the fabric) and re-iron. If it’s fully bonded, your best bet is to trim the uneven parts and re-hem that section.
- Stiff Hem: Too much glue or a very thick hemming tape can make the hem feel stiff. If it’s slightly stiff, wear and washing will usually soften it. If it’s very stiff, you might consider a different method for future hemming projects.
Frequently Asked Questions (FAQ)
Q1: Can I hem boyfriend jeans without sewing and have it look professional?
Yes! Using quality fabric glue or iron-on hemming tape, you can achieve a very clean and professional-looking hem that closely resembles a sewn finish. The key is careful measurement, precise application, and following the product instructions.
Q2: How much length should I leave for hemming boyfriend jeans?
For boyfriend jeans, a hem allowance of 1 to 2 inches is typically sufficient. This allows for a neat fold that creates a clean cuff without making the jeans look too
.lwrp.link-whisper-related-posts{
margin-top: 40px;
margin-bottom: 30px;
}
.lwrp .lwrp-title{
}.lwrp .lwrp-description{
}
.lwrp .lwrp-list-container{
}
.lwrp .lwrp-list-multi-container{
display: flex;
}
.lwrp .lwrp-list-double{
width: 48%;
}
.lwrp .lwrp-list-triple{
width: 32%;
}
.lwrp .lwrp-list-row-container{
display: flex;
justify-content: space-between;
}
.lwrp .lwrp-list-row-container .lwrp-list-item{
width: calc(25% – 20px);
}
.lwrp .lwrp-list-item:not(.lwrp-no-posts-message-item){
max-width: 150px;
}
.lwrp .lwrp-list-item img{
max-width: 100%;
height: auto;
object-fit: cover;
aspect-ratio: 1 / 1;
}
.lwrp .lwrp-list-item.lwrp-empty-list-item{
background: initial !important;
}
.lwrp .lwrp-list-item .lwrp-list-link .lwrp-list-link-title-text,
.lwrp .lwrp-list-item .lwrp-list-no-posts-message{
}@media screen and (max-width: 480px) {
.lwrp.link-whisper-related-posts{
}
.lwrp .lwrp-title{
}.lwrp .lwrp-description{
}
.lwrp .lwrp-list-multi-container{
flex-direction: column;
}
.lwrp .lwrp-list-multi-container ul.lwrp-list{
margin-top: 0px;
margin-bottom: 0px;
padding-top: 0px;
padding-bottom: 0px;
}
.lwrp .lwrp-list-double,
.lwrp .lwrp-list-triple{
width: 100%;
}
.lwrp .lwrp-list-row-container{
justify-content: initial;
flex-direction: column;
}
.lwrp .lwrp-list-row-container .lwrp-list-item{
width: 100%;
}
.lwrp .lwrp-list-item:not(.lwrp-no-posts-message-item){
max-width: initial;
}
.lwrp .lwrp-list-item .lwrp-list-link .lwrp-list-link-title-text,
.lwrp .lwrp-list-item .lwrp-list-no-posts-message{
};
}


