


Quick Summary: Learn the easiest way to hem dad jeans at home! This guide shows you how to achieve a custom, flattering fit for your favorite relaxed-fit denim without needing a sewing machine. Get ready for perfectly-length jeans in minutes.
Dad jeans. We love them for their comfort and nostalgic vibe, but sometimes they’re just a little too long. That dreaded “pooling” at the ankle can make even the coolest pair look sloppy. Don’t throw them out or live with the bunching! You can easily achieve a sharp, custom hem right at home. Forget expensive tailor visits or complicated sewing projects. We’re going to walk through a simple, effective method that anyone can do, transforming your comfy dad jeans into a perfectly proportioned staple in your wardrobe.
Why Hemming Your Dad Jeans Matters

A proper hem is more than just a styling choice; it’s about making your clothes work for you. For dad jeans, in particular, getting the length just right can make a surprising difference. Too long, and they can shorten your legs, look messy, and even wear out faster at the hem. Too short, and well, that’s a whole other fashion dilemma. The ideal length should just graze the top of your shoe, creating a clean line that elongates your silhouette. This article focuses on a no-sew method because we know that not everyone has a sewing machine or the desire to learn complex techniques. Our goal is to give you confidence in transforming your clothes with simple, practical solutions.
Understanding Your Dad Jeans and the Goal

Dad jeans are typically characterized by their relaxed fit, often with a higher waist and a straighter leg than many modern styles. They offer comfort and a laid-back look. However, the “one-size-fits-all” length isn’t always ideal for every body type or shoe pairing. The goal of hemming is to determine your perfect inseam and remove the excess fabric cleanly, presenting a finished edge that looks intentional, not makeshift.
Before we dive into the how-to, let’s understand the common challenges:
- Excess Fabric: The most obvious issue is bunched material around the ankles.
- Proportions: Jeans that are too long can make you appear shorter.
- Wear and Tear: Untidy or dragging hems can fray and wear out faster.
The Proven, Effortless No-Sew Hem Method

This method uses fabric glue and a few common household items to create a durable, neat hem. It’s perfect for denim and requires no sewing skills whatsoever. We’ll be aiming for a clean, folded hem that sits neatly against your shoe.
What You’ll Need
Gather these few essential items before you begin. Having everything ready makes the process smooth and efficient.
- Your dad jeans
- Fabric scissors or very sharp fabric shears
- Fabric glue (look for one that’s permanent and washable, like Aleene’s Fabric Fusion Tape is a popular choice, though this is a glue option for a permanent bond)
- Measuring tape or a ruler
- Fabric chalk or a colored pencil/pen (disappearing ink is ideal)
- Iron and ironing board
- A heavy book or cutting mat (to protect your surface)
- Optional: Pins (for temporarily holding fabric in place)
Finding the right fabric glue is key. Ensure it’s specifically designed for fabric and known for a strong, long-lasting hold. Some glues can leave a stiff residue, so reading reviews or looking for flexible formulas can be beneficial.
Step-by-Step Guide to Hemming Your Dad Jeans
Follow these simple steps to get your dad jeans looking sharp and feeling comfortable.
-
Determine Your Ideal Length
Put on the shoes you most commonly wear with your dad jeans. Wear the jeans and stand in front of a mirror. Decide where you want the hem to fall. Typically, this is just covering the top of your shoe. You can also use a measuring tape to measure from the crotch seam down to where you want the hem to end, but trying them on is the most accurate way.
-
Mark the Hemline
With the jeans still on (or carefully placed next to you if the on-body marking is too tricky), use your fabric chalk or disappearing ink pen to mark the desired hem length. Start by making a small dot on the outer seam, then the inner seam, and then connect these dots with a straight line all the way around. Ensure the line is level. If this is difficult while wearing, lay the jeans flat and measure from the crotch down to your desired length on both the front and back panels, then draw your line. Always add about 1.5 to 2 inches to your desired final length to account for the fold.
Pro Tip: If marking while wearing, have a friend help you ensure the line is perfectly straight and at the same height all around the leg.
-
Measure and Cut the Excess Fabric
Take off the jeans and lay them flat on your workspace. Measure out the extra 1.5 to 2 inches you marked in the previous step from your desired hemline. Use your ruler to draw a straight cutting line. Once you’re confident in your measurements, use your sharp fabric scissors to carefully cut along this line. Cut through both layers of the denim evenly.
Important Consideration: If your dad jeans have a specific finished hem (like a frayed edge or a wider cuff), you’ll want to account for that when measuring and cutting. For a standard hem, cutting off the existing hem and creating a new one is usually best.
-
Create the First Fold
Take the cut edge of the denim and fold it upwards towards the inside of the leg opening, aligning it with your marked hemline (the line where the final hem will be). Press this fold firmly with your iron. This creates a crisp, neat edge for the first fold.
-
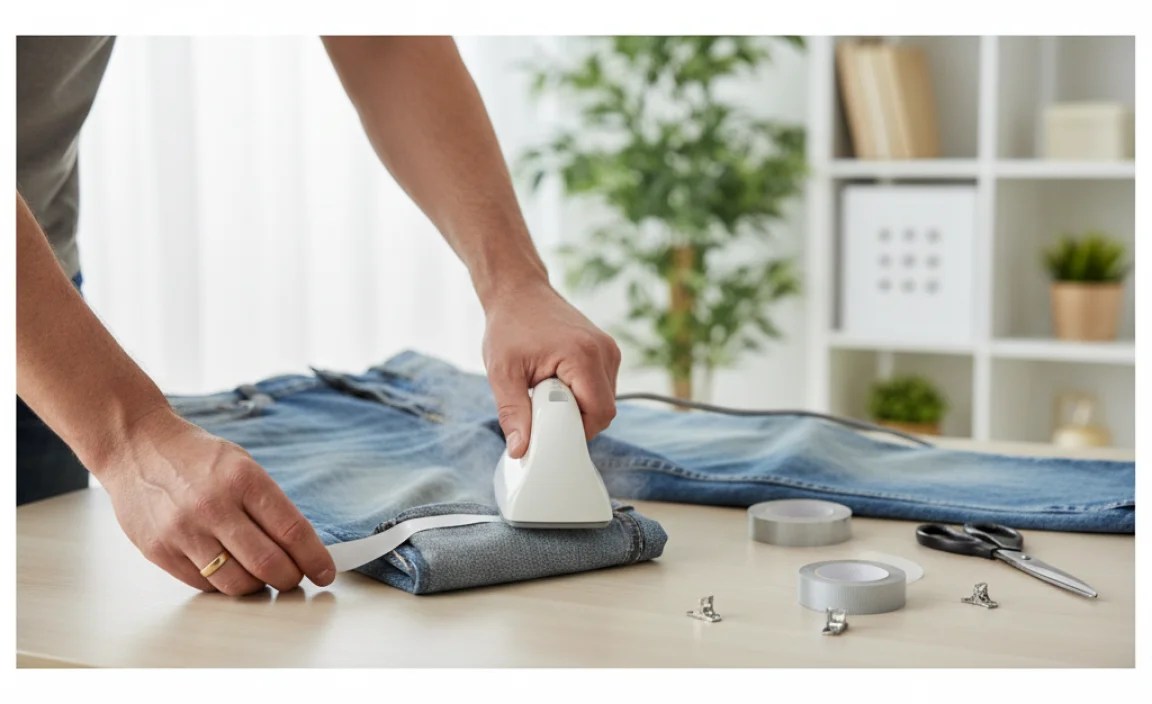
Apply the Fabric Glue
Carefully apply a generous, even bead of fabric glue along the raw edge of the denim that is now tucked inside your first fold. Ensure the glue goes right up to the folded edge. You can also apply a thin line of glue on the inside of the first fold itself to ensure good adhesion.
-
Make the Second Fold and Press
Now, fold the fabric upwards a second time, over the raw edge and the glue. This second fold should bring the total hem width to about 1 inch (if you started with 1.5-2 inches of fabric for the hem allowance). Press this second fold down very firmly with your iron. Use the hot iron to activate the glue and set the hem in place. You may need to hold the iron there for a bit longer than usual to ensure a strong bond. The goal is to create a smooth, flat hemmed edge.
Tip for Durability: For extra strength, consider using fabric glue specifically designed for jeans or heavy-duty fabrics. Some crafters also use a hem tape, which is applied with heat and creates a strong bond, though the glue method offers a bit more give.
-
Secure and Let Dry
Once you’ve ironed the second fold, you can add a few pins to hold the hem in place while the glue dries completely. It’s crucial to let the fabric glue cure for the time recommended by the manufacturer (usually 24-72 hours) for maximum durability. Avoid washing or wearing the jeans during this period.
-
Final Check
After the glue has fully dried, remove any pins. Try on your newly hemmed dad jeans. Check the length and the neatness of the hem from all angles. You should have a clean, permanent hem that looks like it was professionally done!
Alternative No-Sew Methods
While fabric glue is highly effective, there are a couple of other no-sew options you might consider if you don’t have glue readily available or prefer a different approach.
Fabric Tape Method
This method is similar to using glue but relies on a strong, double-sided adhesive tape designed for fabrics. Brands like HeatnBond Ultrahold Permanent Adhesive Iron-On are excellent for this. You iron the tape onto the fabric, fold, and iron again to secure. It’s fast and offers a very clean finish.
Hemming Clips
These are temporary solutions, often used for quick fixes or to test a hem length before committing to a permanent method. You use clips to hold the folded fabric in place. They don’t provide a permanent finish but can be useful for visualising the final look.
Pros and Cons of No-Sew Hemming

Every method has its advantages and disadvantages. Understanding these can help you choose the best approach for your needs.
| Pros | Cons |
|---|---|
| Quick and easy to do at home. | Can be less durable than sewn hems, especially with heavy wear or frequent washing. |
| No sewing machine or special skills required. | Glue or tape can sometimes leave a stiff or slightly visible line if not applied carefully. |
| Cost-effective compared to professional tailoring. | May not hold up as well to aggressive washing cycles or high heat in the dryer. |
| Allows for quick alterations and adjustments. | Improper application can lead to the hem coming undone over time. |
| Great for beginners and those who need a fast solution. | The finished look might not be as refined as a professional sewn hem. |
Tips for Maintaining Your New Hem
To ensure your no-sew hem lasts as long as possible, follow these simple care instructions:
- Washing: Turn your jeans inside out before washing. Use a gentle cycle with cold water. Avoid harsh detergents.
- Drying: Air dry your jeans whenever possible. If you must use a dryer, opt for the lowest heat setting and remove them while slightly damp. High heat can weaken fabric glue or tape.
- Ironing: If ironing becomes necessary, iron on the reverse side and use a pressing cloth to protect the hem area. Avoid direct high heat on the glued seam.
- Repairs: If you notice any loosening, small stitches can be added with a needle and thread for extra reinforcement, even if the primary hem is glued.
Adhering to these washing and drying guidelines, often recommended by fabric glue manufacturers, will significantly extend the lifespan of your hemmed jeans. For instance, following the Environmental Protection Agency’s general advice on laundry efficiency can also benefit garment longevity.
Frequently Asked Questions About Hemming Dad Jeans
Q1: Can I hem dad jeans without any glue or tape?
A1: While temporary solutions like hemming clips exist, for a permanent hem without sewing, fabric glue or iron-on hem tape are the most effective methods for jeans.
Q2: How much fabric should I leave for the hem allowance?
A2: For most jeans, an allowance of 1.5 to 2 inches is ideal. This provides enough fabric for two folds to create a clean, sturdy hem that won’t easily fray.
Q3: Do I need a special type of fabric glue?
A3: Yes, choose a fabric glue specifically designed for permanent bonding and that’s washable. Strong, flexible formulas work best for denim, preventing stiffness and cracking.
Q4: How do I ensure the hem is straight?
A4: Mark the hemline carefully with chalk or a disappearing pen. Laying the jeans flat and using a ruler is crucial. Measure consistently from the crotch down, or use an existing pair of well-fitting jeans as a guide.
Q5: How long does the glue take to dry and become permanent?
A5: Most fabric glues require 24-72 hours of drying time to reach full strength. Always check the product instructions for specific drying and curing times.
Q6: Can I wash my hemmed jeans in the washing machine?
A6: Yes, but it’s best to wash them inside out on a gentle cycle with cold water and air dry them to maintain the integrity of the glued hem.
Q7: What if my dad jeans have a raw or distressed hem?
A7: If you want to replicate a raw hem, you can cut along your desired line and then fray the edge slightly using tweezers or a stiff brush after applying glue or tape on the inside to prevent further unraveling. For a clean hem, cut off the existing hem and create a new one as described.
Conclusion
Hemming your dad jeans doesn’t have to be a daunting task. With this simple, no-sew fabric glue method, you can achieve a custom fit that flatters your silhouette and elevates your entire look. By taking a few precise measurements, folding carefully, and using the right adhesive, you’ve transformed a common wardrobe frustration into an easy, satisfying DIY project. Now you can wear your favorite comfortable dad jeans with confidence, knowing they’re perfectly proportioned for you. Don’t let ill-fitting pants hold you back – embrace these straightforward techniques and enjoy your perfectly hemmed denim!


