


Learn how to hem flare jeans easily with this step-by-step guide. Achieve a perfect fit for your beloved bell bottoms without a trip to the tailor. Follow simple instructions and practical tips for a professional-looking finish.
Flares can be tricky to get just right, and often beautiful jeans end up in the back of the closet because they’re too long. Don’t let that happen to your favorite pair of flare jeans! Whether they’re a new purchase or a beloved old favorite that shrunk a bit, hemming them yourself is totally achievable. This guide will walk you through every step, making sure you get a neat, even hem that looks like it was done by a pro. We’ll cover everything you need, from measuring to the final stitch, so you can wear your flares with confidence.
Why Hem Your Flare Jeans?

Flare jeans, with their distinctive widening from the knee down, offer a stylish silhouette that’s seen a resurgence in fashion. However, their unique shape can also make them challenging to hem correctly. The flare itself means a simple straight hem might not sit right, or it could look disproportionate. Getting the length just right is crucial for the intended look – too long and they’ll drag, too short and the flare might look awkward.
Customizing the length ensures your jeans not only fit perfectly but also complement your favorite footwear. A well-hemmed pair of flare jeans can elevate your entire outfit, making them a staple in any wardrobe. Ignoring the length can lead to frumpy-looking pants that don’t flatter your figure as they should.
Essential Tools and Materials
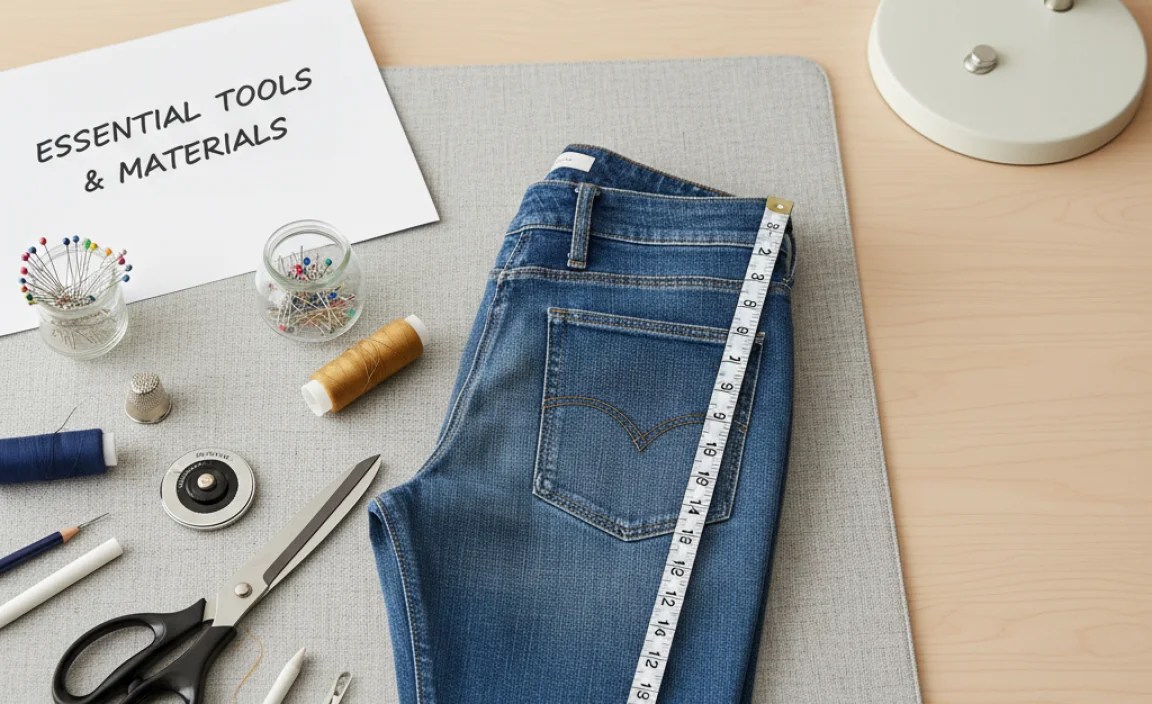
Before we begin, gather your supplies. Having everything ready will make the process smooth and stress-free.
Your Flare Jeans: The star of the show!
Sharp Fabric Scissors: Crucial for clean cuts. Invest in a good pair dedicated to fabric if possible.
Measuring Tape: A flexible one is best for measuring around curves.
Fabric Marker or Chalk Wheel: For marking your hemline. A washable marker is ideal.
Pins: Plenty of sharp pins to hold the fabric in place.
Iron and Ironing Board: Essential for pressing seams and achieving crisp folds.
Thread: Matching the color of your jeans is best for an invisible finish.
Sewing Machine (Optional but Recommended): Significantly speeds up the process and creates a durable stitch. A standard home sewing machine will work perfectly.
Needle (If Sewing by Hand): A sturdy needle suitable for denim.
Seam Ripper (Optional): For undoing any mistakes or removing an old hem.
Thick Underlay (Optional): Like a cutting mat or thick cardboard, to place under the hem when marking to prevent bleed-through.
Getting Started: Prepping Your Jeans
Preparation is key to a successful hem. Let’s get your jeans ready.
1. Wash and Dry Your Jeans: Always preshrink your jeans before hemming, just as you would before wearing them for the first time. Fabric can shrink unevenly, and you don’t want to hem them perfectly only to have them shrink further later. This also removes any sizing agents that might interfere with marking or sewing.
2. Inspect the Original Hem: Note how the original hem was constructed. Most jeans have a double-folded hem, often with a topstitch. For an authentic look, you’ll want to replicate this. If the original hem is damaged or you want a cleaner, narrower hem, you might want to remove it first using a seam ripper. Pay attention to the original stitch line to help guide your new hem.
Step-by-Step Guide to Hemming Flare Jeans

Now, let’s get to the actual hemming. We’ll break this down into manageable steps.
Step 1: Determine the Correct Length
This is arguably the most important step. The goal is for your jeans to lay perfectly flat on the floor when you’re wearing them with your intended shoes.
1. Wear Your Jeans: Put on the flare jeans and the shoes you intend to wear with them most often. This is crucial because different shoe heights will change the required length.
2. Stand on a Flat Surface: Ensure you are standing on a level floor.
3. Find a Helper (Recommended): It’s much easier to get an accurate measurement with someone else helping you. They can pin the hem while you stand still. If you’re alone, you can try pinning one leg and then carefully transferring the measurement to the other, or use a mirror.
4. Pin the Hemline: Have your helper hold the excess fabric at the bottom of the leg. They should carefully fold the excess fabric upwards, creating a temporary hem. The goal is to have the bottom edge of the jean leg just graze the top of your shoe. A common mistake is to hem them too short, so aim for them to be slightly longer rather than shorter, as you can always trim more later.
5. Check the Other Leg: Once one leg is pinned, carefully replicate the pinned length on the other leg. Try to make them as symmetrical as possible.
Pro Tip: For a more precise measurement, have your helper mark the desired hem length with a pin or a fabric marker directly on the inside of the jean leg.
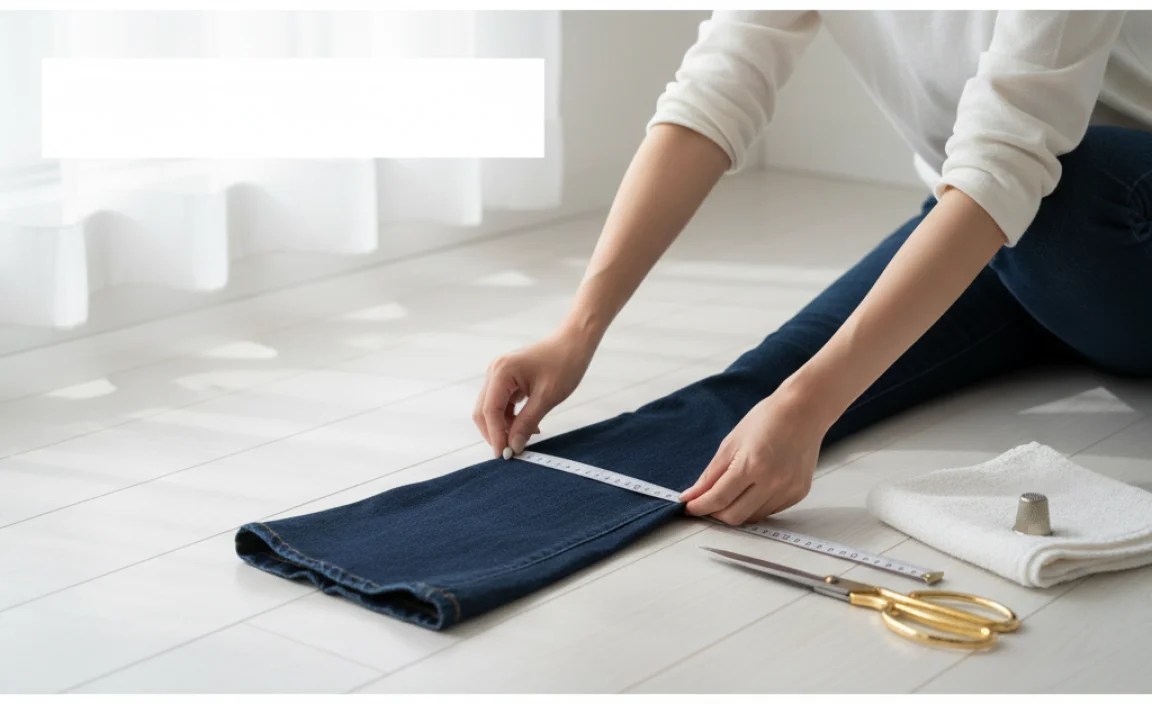
Step 2: Mark Your Cut Line
Once you’ve pinned the desired length, it’s time to make it permanent.
1. Lay Jeans Flat: Carefully take off the jeans and lay them flat on a clean, hard surface. Ensure the fabric is smooth and free of wrinkles.
2. Transfer the Pin: If you used pins, carefully go around the circumference of the leg, marking the pinned line with your fabric marker or chalk. If you have a helper, they can hold the fabric while you mark. If you’re on your own, gently lift the fabric along the pin line and mark it.
3. Add Hem Allowance: You need to add extra fabric for the fold. A standard hem allowance for denim is usually 1 to 1.5 inches (2.5 to 3.8 cm). This extra fabric will be folded up twice. Mark this allowance below your first marked line. So, if your desired finished hem length is at the 1-inch mark from the pinned excess fabric, you’ll cut at the 2-inch mark (1 inch desired hem + 1 inch allowance).
4. Check for Evenness: Ensure your marked cut line is perfectly parallel to the floor all the way around the leg. This might require adjusting as you move around the curve of the flare.
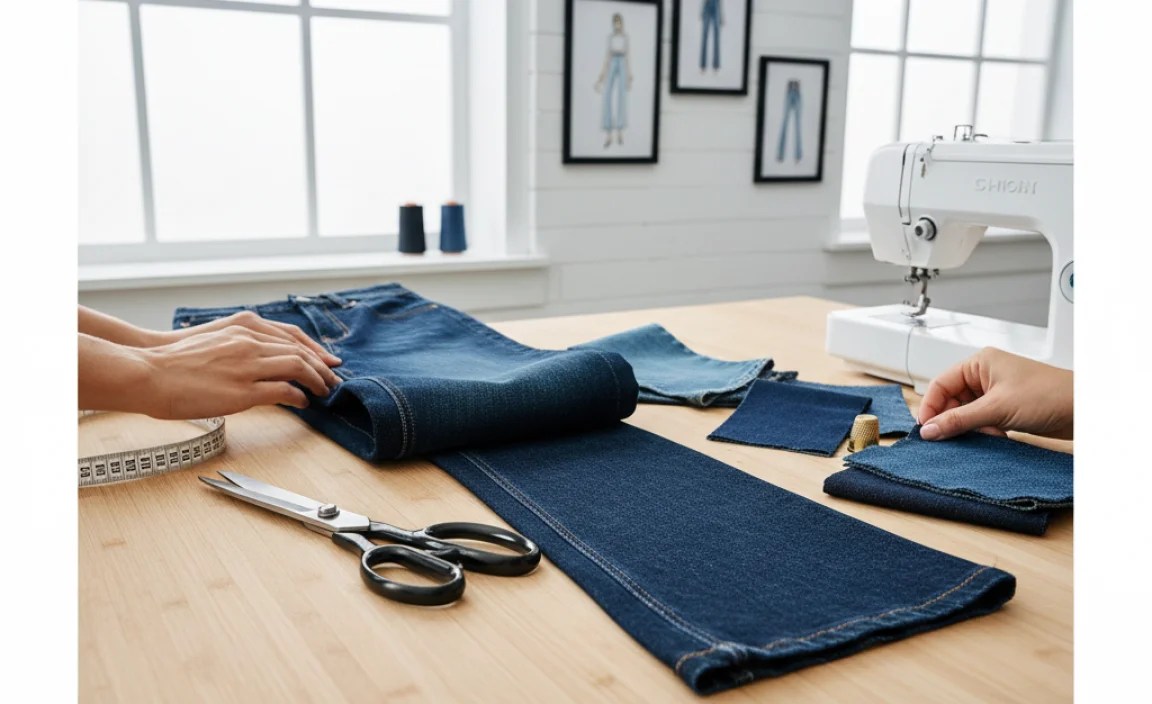
Step 3: Cut the Excess Fabric
With your cut line clearly marked, it’s time to trim.
1. Use Sharp Scissors: Make sure your fabric scissors are sharp. Dull scissors can fray the denim and make the fabric difficult to work with.
2. Cut on the Marked Line: Carefully cut along the outer marked line (the one indicating your hem allowance). Try to make your cut as straight and even as possible.
3. Repeat for Both Legs: Once one leg is cut, repeat the entire process for the second leg, ensuring the length and the hem allowance are identical.
Step 4: Prepare the Hem for Sewing
Now we create the fold that will become your new hem.
1. First Fold: Take the cut edge of the fabric and fold it upwards towards the inside of the jeans. Align this raw edge with your initial marked hemline (the line where the finished hem will sit). Press this fold firmly with your iron. This creates your first fold.
2. Second Fold: Now, fold this creased edge upwards again, tucking the raw edge underneath. The width of this second fold should be consistent and match your desired finished hem width (usually around 1 inch or 2.5 cm). You are essentially folding the fabric over itself to create a clean, double-folded hem.
3. Press and Pin: As you fold, press each section firmly with the iron. Once folded and pressed, secure the hem all the way around with pins. Place pins perpendicular to the folded edge, about every 1-2 inches. Ensure the pins are catching all layers of fabric securely.
Table: Hem Allowance Guidelines
| Jean Style | Recommended Hem Allowance | Finished Hem Width |
| :——— | :————————– | :—————– |
| Flare Jeans | 1 to 1.5 inches (2.5-3.8 cm) | 0.5 to 0.75 inches (1.3-1.9 cm) |
| Straight Leg | 1 inch (2.5 cm) | 0.5 inch (1.3 cm) |
| Skinny Jeans | 0.75 to 1 inch (1.9-2.5 cm) | 0.5 inch (1.3 cm) |
Note: Hem allowance is the extra fabric you add below your finished hemline to fold into the hem. The finished hem width is the visible width of the hem once folded and sewn.
Step 5: Sewing the Hem
This is where your jeans get their permanent new length.
Option A: Sewing with a Sewing Machine
1. Set Up Your Machine: Thread your sewing machine with thread that matches your jeans. Set your stitch length to a medium setting (around 2.5 mm). If you have a denim needle, use it, as it’s designed for thicker fabrics.
2. Position the Jeans: Place the jeans under the sewing machine arm, with the folded hem facing upwards. Align the edge of the folded hem with the presser foot. Start sewing slightly before the pinned section to secure your stitches.
3. Sew Around the Leg: Carefully guide the fabric, keeping the folded edge against the presser foot. Sew all the way around the leg, going slowly and steadily. If you encounter thick seams or bulky areas, you might need to lift the presser foot slightly and manually turn the handwheel to get over them.
4. Backstitch and Trim: When you reach the starting point, backstitch for about half an inch to secure the seam. Trim any excess threads.
5. Repeat for Both Legs: Do the same for the other leg, ensuring a consistent stitch line.
Option B: Sewing by Hand
1. Thread Your Needle: Use a sturdy needle and thread that matches your jeans. Knot the end of the thread.
2. Start Sewing: Begin at an inconspicuous spot (like the inner seam). Insert your needle from the inside of the fold and bring it through to the outside, just at the edge of the folded fabric.
3. Use a Hemming Stitch: The blind hem stitch (also known as a blind stitch or slip stitch) is ideal for an invisible finish. Bring your needle forward through the folded fabric, pick up just one or two threads of the jean fabric, and then go back into the fold. Continue this process, making small stitches and pulling the thread gently to create minimal visibility on the outside. Ensure your stitches are close enough together for security but still create a neat appearance.
4. Continue Around: Work your way around the entire leg.
5. Finish Off: When you reach your starting point, tie a secure knot on the inside of the hem and trim the excess thread.
6. Repeat for Both Legs: Hem the second leg with the same care.
Step 6: Finishing Touches
Almost done! Let’s give it that polished look.
1. Press Again: Once sewn, take your iron and press the new hem firmly. This will help the stitches lay flat and give a crisp, professional finish.
2. Try Them On: Put your newly hemmed flare jeans on with your shoes. Check the length again. If they are still a touch too long, you can carefully repeat the folding and sewing process, making the hem slightly narrower.
Adapting for Different Denim Styles
While this guide focuses on flare jeans, the core principles apply to most denim hemming projects.
Straight Leg Jeans: Often have a simpler construction. A slightly narrower hem allowance might suffice, and the straightness of the leg makes marking easier.
Skinny Jeans: Require careful fitting. You might opt for a narrower hem to avoid bulk. Ensuring the hem doesn’t constrict the leg is key.
Bootcut Jeans: Similar to flares, but the flare is less pronounced. The same methods apply.
Raw Hem: If you prefer a more casual, deconstructed look, you can simply cut the jeans to your desired length, fray the edges slightly, and wash them to encourage further fraying. No sewing is required.
Troubleshooting Common Hemming Issues
Even with careful work, you might encounter minor hitches. Here’s how to fix them:
Uneven Hem: If you notice your hem isn’t perfectly straight after sewing, don’t panic. You can often trim a little extra fabric carefully and re-press the hem. For a significant issue, you might need to unpick the stitches and start the hemming process again, paying closer attention to the marking and folding stages.
Stitches Coming Undone: This is more common with hand-sewing if knots aren’t secured properly. If a few stitches loosen, simply go back over that section and re-secure them.
Wavy Hem: This can happen if the fabric was stretched while sewing or if the folds weren’t pressed firmly. A good final pressing with steam can often help flatten it out. If it’s very wavy, unpicking and re-sewing with less tension might be necessary.
Frequently Asked Questions About Hemming Flare Jeans
Q1: How much fabric should I leave for hemming flare jeans?
A1: For flare jeans, it’s generally recommended to leave 1 to 1.5 inches (2.5 to 3.8 cm) of fabric below your desired finished hemline. This allows for a double fold, which creates a clean and durable finish.
Q2: What is the best way to mark the hemline on flare jeans?
A2: The best way is to wear the jeans with your intended shoes and have a friend pin them to your desired length. Then, lay the jeans flat and use a fabric marker or chalk to transfer the pinned line, adding your hem allowance below that. Using a measuring tape to ensure the marked line is equidistant from the bottom all the way around is also very important.
Q3: Can I hem flare jeans without a sewing machine?
A3: Yes, absolutely! You can achieve a neat hem by hand. A blind hem stitch is recommended for a nearly invisible finish on the outside. It just takes a bit more time and patience.
Q4: How do I make my hem look professional?
A4: Professional-looking hems often involve a double fold to hide the raw edge, a consistent stitch line, and a good press with an iron. Matching your thread color to the denim and using a stitch that minimizes visibility on the outside (like a blind hem stitch) also contribute greatly.
Q5: My flare jeans look different lengths after hemming. What did I do wrong?
A5: This is usually due to inconsistencies in marking or cutting. Ensure the jeans are laid perfectly flat and that your cut and fold lines are parallel to the floor all the way around. It’s beneficial to measure the inseam and outseam of both legs to confirm they match after marking.
Q6: Should I hem flare jeans with the original hem?
A6: It depends on the look you want. Keeping the original hem can create an authentic, slightly chunkier look if done correctly. However, it can be tricky with flares, as the original hem might not lie flat. For a cleaner, more modern look, it’s often better to remove the original hem and create a new one. You can often reuse the original hem fabric to create a new, wider hem if you want to maintain that original denim edge effect.
Q7: How do I hem flare jeans if I want to keep the original frayed edge?
A7: To keep an original frayed edge, you’ll need to carefully remove the existing sewn hem using a seam ripper. Then, determine your desired length, cut the excess fabric leaving about 1-1.5 inches for a fold. Fold this allowance up and press. You can then either sew this folded hem down securely, or, for a truly frayed look, carefully unravel about 1/2 to 1 inch of the cut edge to create your desired frayed effect, and then sew the new hem above this frayed portion for stability.
Conclusion
Hemming your flare jeans is a rewarding skill that puts you in control of your wardrobe. By following these steps, you can achieve a flattering fit that perfectly complements your style and your favorite shoes. Don’t be afraid to take your time, especially during the measuring and marking phases. A little patience and precision will go a long way, transforming your jeans from too-long to perfectly tailored. Now you have the knowledge to confidently tackle that hem, ensuring your flare jeans look their best and get the wear they deserve. Enjoy your perfectly fitting flares!


