


Quick Summary: Learn how to easily hem relaxed jeans for a perfect fit. This guide provides simple, step-by-step instructions, covering everything from measuring to the final stitch, ensuring you achieve effortless, professional-looking results at home.
Finding jeans that fit just right can be a challenge, especially with the relaxed fit trend. Too long, and they bunch unattractively at the ankle; too short, and they can look awkward. Don’t let ill-fitting denim hold you back. You can achieve a polished, custom hem at home with a few basic tools and some clear guidance. This article will walk you through the entire process, from preparing your jeans to confidently sewing your new hem, ensuring you get a perfect cuff every time.
Why Hemming Your Relaxed Jeans is a Smart Move

Relaxed fit jeans offer comfort and style, but their looser cut can sometimes lead to an overwhelming amount of excess fabric around the ankles. This can make even the most stylish pair look sloppy. Hemming your jeans professionally might seem like a good option, but it can be surprisingly expensive and time-consuming. Learning to do it yourself not only saves money but also gives you complete control over the final look. You can ensure the length is exactly what you want, whether you prefer them to just skim your shoes or sit perfectly with your favorite sneakers.
A well-hemmed pair of jeans instantly elevates your entire outfit. It shows attention to detail and can make a casual look appear much more put-together. For beginners, the idea of cutting and sewing denim might seem daunting, but relaxed jeans are actually a fantastic starting point. Their forgiving nature means minor imperfections are less noticeable, and the process is less precise than hemming skinny jeans. Let’s break down how you can achieve great results right at home.
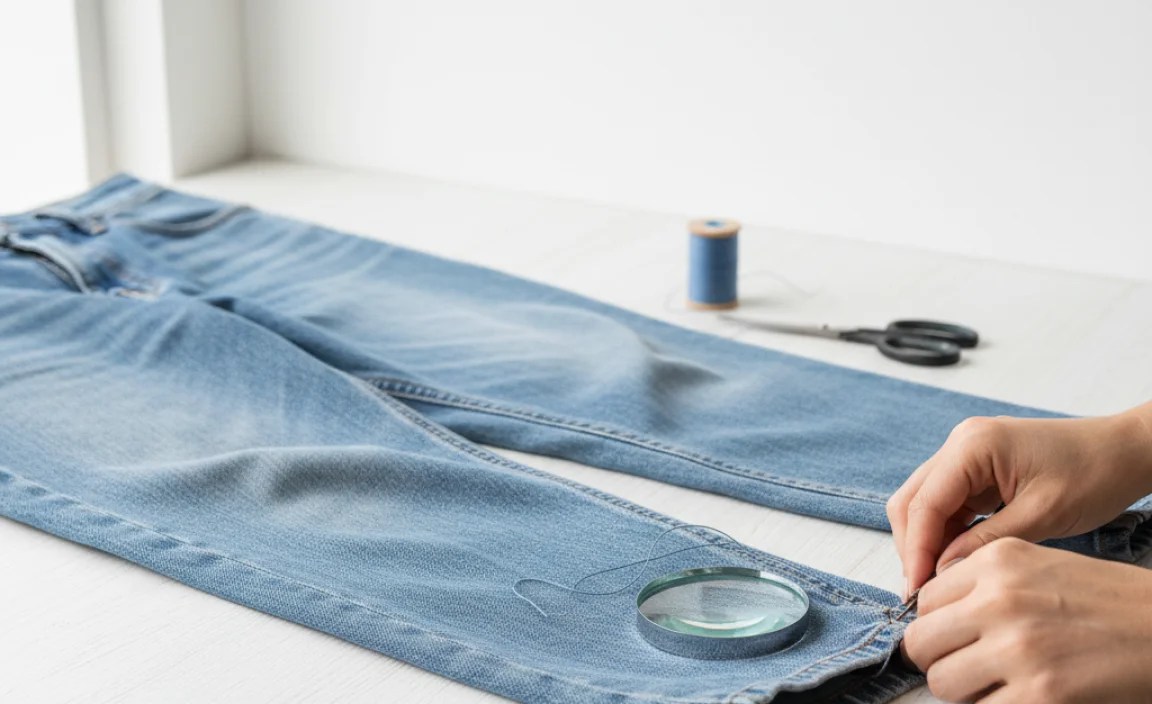
Gathering Your Tools: What You’ll Need

Before you start, having all your supplies ready will make the process smooth and stress-free. Here’s a checklist of what you’ll need:
- Your Relaxed Jeans: The star of the show!
- Fabric Scissors: Sharp scissors are crucial for a clean cut. Regular scissors can snag and fray the denim. Invest in a decent pair specifically for fabric.
- Measuring Tape or Ruler: For accurate length measurements. A flexible tailor’s tape measure is ideal.
- Fabric Marker or Chalk: To mark your cutting line. Choose a color that will be visible on your denim but will wash out easily.
- Iron and Ironing Board: Essential for pressing seams and creating crisp folds for a neat finish.
- Straight Pins: To hold the hem in place while you sew.
- Sewing Machine (Recommended): While you can hand-sew, a sewing machine will produce a stronger, more durable, and professional-looking hem. If you don’t have one, a strong hand-stitching method will work.
- Thread: Match your denim color as closely as possible. If you have the original hem, try to match the thread color used there for an authentic look. A strong polyester or cotton-poly blend is good.
- Seam Ripper (Optional): Useful if you decide to remove the original hem to preserve its look.
- A Friend (Optional but helpful): An extra pair of eyes can be useful for checking the length and ensuring evenness.
Step-by-Step Guide: Hemming Your Relaxed Jeans

Follow these steps carefully to get a perfect hem on your relaxed jeans. We’ll cover measuring, cutting, and sewing. Remember to work on a flat surface and take your time for the best results.
Step 1: Preparation and Initial Measurement
First, wash and dry your jeans as you normally would. This ensures they won’t shrink further after you hem them. Lay them flat on a clean surface.
Put on the shoes you typically wear with these jeans. Stand in front of a mirror. Decide how long you want your jeans to be. Consider where the hem should fall: just above the shoe, covering the laces slightly, or hitting the top of your heel. For relaxed fit jeans, a common preference is for the hem to just touch or slightly rest on the shoe, avoiding excessive bunching.
Measure from the crotch seam down to your desired length on the inseam (the inner leg seam). Write this measurement down. Now, you need to determine how much extra fabric to leave for the hem itself. A standard hem allowance for denim is typically between 1 inch and 3 inches, depending on how wide you want your final hem to be and whether you want to create a double fold. For a clean, modern look on relaxed jeans, a 1.5 to 2-inch allowance is often sufficient for a single fold, or 2.5 to 3 inches for a double fold (where you fold the fabric twice to encase the raw edge).
Take your chosen measurement (e.g., desired length plus hem allowance) and mark it on the inseam. Use your fabric marker or chalk. Repeat on the outseam (the outer leg seam), ensuring it’s parallel to the inseam marking. It’s crucial that the hem is perfectly straight and even all the way around.
Step 2: Marking the Cutting Line
Once you have your initial marks, it’s time to draw a clear cutting line. Lay the jeans flat, smoothing out any wrinkles. Start at the inseam mark and use your ruler and fabric marker to draw a straight line parallel to the original hem, extending it towards the outseam. Make sure this line is consistent all the way around the leg opening. A squared ruler can be very helpful here to ensure perpendicular lines.
Pro Tip: Have someone help you by holding the jeans taut while you mark, or by checking the line for straightness. You can also use a large book or a cutting mat as a guide under the fabric if you find it difficult to draw a perfectly straight line freehand.
Step 3: Cutting the Excess Denim
This is often the most nerve-wracking part, but remember: you’ve measured carefully! Using your sharp fabric scissors, carefully cut along the marked line. Cut smoothly and steadily, trying to make one continuous cut if possible. If the fabric is thick, you might need to make several smaller cuts. Ensure you cut through both layers of fabric that form the leg opening.
Once one leg is cut, lay the jeans flat and carefully align the second leg with the first. Use the cut hem of the first leg as a guide to mark and cut the second leg. This ensures both legs will be the exact same length and have the same hem shape.
Step 4: Preparing the Hem for Sewing (Folding)
Now, you’ll prepare the raw edge for sewing. For a clean, single-fold hem:
- Fold the raw edge of the denim up by ½ inch towards the inside of the jeans.
- Press this fold firmly with your iron.
- Then, fold the fabric up again by the remaining amount of your hem allowance (e.g., if you allowed 1.5 inches total, you’ve folded ½ inch, so now fold up another 1 inch).
- Press this second fold very well. This creates a neat, double-folded hem that encloses the raw edge, preventing fraying and giving a professional finish.
For a double-fold hem (if you allowed more fabric, say 2.5 inches for a finished 1.5-inch hem):
- Fold the raw edge up by 1 inch. Press.
- Fold the fabric up again by the remaining 1.5 inches. Press firmly.
Pin the hem in place all the way around using straight pins. Place pins perpendicular to the folded edge. Ensure the folded edge lies flat and is smooth. Check from the outside to make sure the fold is even and straight.
Step 5: Sewing the Hem
Using a Sewing Machine:
- Thread your sewing machine with thread that matches your denim. Set the stitch length to a medium-long stitch (around 2.5-3.5 mm). Denim requires a sturdy stitch.
- Start sewing just after a side seam, with the machine needle down into the fabric. Backstitch a few stitches to secure the beginning of your seam.
- Sew all the way around the folded hem, removing pins as you go. Aim to stitch close to the inner folded edge (about 1/8 inch from the edge).
- When you reach your starting point, backstitch again for a few stitches to reinforce the seam. Cut your threads.
- Press the finished hem with your iron.
Hand Sewing:
- Thread a needle with a strong thread, doubled up for extra strength, and knot the end.
- Use a blind hem stitch (also known as a slip stitch) for the most invisible result. To do this, take a small stitch in the folded part of the hem, then a tiny stitch into the main jeans fabric just below the fold, catching only a thread or two. Pull the thread through.
- Repeat this process, keeping your stitches small and even. The goal is to make the stitches on the outside nearly invisible.
- Continue around the entire hem, securing it firmly. Knot the thread securely at the end.
- Press the finished hem with your iron.
Step 6: Finishing Touches
Remove all the pins. Give the hem a final press with your iron to ensure it lies flat and crisp. Trim any excess threads. If you opted to preserve the original hem of your jeans (a technique called “re-hemming”), you would carefully remove the original hem stitching with a seam ripper, then fold and sew the new hem underneath the original cuff, reattaching the original hem strip to the bottom of the new hem for an authentic lived-in look. This is more advanced but can give a very factory-like finish, especially for older, faded jeans.
Preserving the Original Hem: A More Advanced Technique

If your relaxed jeans have a distinctive worn or faded hemline that you want to keep, you can opt for a technique that reattaches this original hem to the newly shortened jeans. This is a popular method for achieving a “factory hem” look.
- Measure and Cut: Follow steps 1-3 above to measure and cut your jeans to the desired length, leaving extra fabric for the hem allowance.
- Remove Original Hem: Using a seam ripper, carefully detach the old hem. Work slowly to avoid damaging the fabric. You’ll be removing the stitching that attaches the hem to the leg. Once detached, carefully remove the original hem strip.
- Press and Prepare: Press the original hem strip flat, removing any old creases. On the leg of the jeans, fold up the raw edge by about ½ inch and press. This creates a clean edge to work with.
- Reattach Original Hem: Position the original hem strip right-side down against the folded edge of the jeans leg. Align the bottom edges. Pin the original hem strip securely to the jeans leg.
- Sew: Using your sewing machine, sew along the seam where the original hem was attached, following the original stitch line if possible. Backstitch at the beginning and end.
- Final Press: Turn the jeans right-side out and press the new hem. You should have the original worn hem now attached to the bottom of your newly shortened jeans.
This method requires patience but offers a highly authentic finish, particularly for jeans where the original hem has unique character.
Troubleshooting Common Hemming Issues
Even with the best intentions, sometimes things don’t go perfectly. Here are a few common issues and how to fix them:
- Uneven Hem: If you notice your hem is slightly uneven after sewing, don’t despair. You can often trim away the excess carefully. For more significant issues, you might need to unpick the stitching and re-mark and re-cut. Always double-check measurements before cutting.
- Fraying Edges: If you didn’t fold the raw edge completely or your stitch came loose, fraying can occur. You can use fray-stopping liquid or carefully trim the frayed threads and re-stitch. A zigzag stitch on the raw edge before folding can also help prevent fraying if you’re only doing a single fold.
- Wavy Seam: A wavy hemline can happen if the fabric stretched while sewing or if the tension on your sewing machine is off. If it’s slight, a good press might help. For more pronounced waves, you might need to adjust your machine’s tension or try a different stitch length.
- Loose Threading: If your sewing machine is leaving loose threads, check that the needle is inserted correctly, that the thread is running smoothly through the guides, and that the tension is properly balanced. Consult your sewing machine manual for troubleshooting tips specific to your model.
Measuring and Hemming Allowance Guide
Choosing the right hem allowance is key to achieving your desired look. Here’s a quick guide:
| Desired Finished Hem Width | Recommended Hem Allowance | Folding Method | Best For |
|---|---|---|---|
| 1 inch | 1.5 – 2 inches | Fold up ½ inch, then fold up remaining 1 – 1.5 inches. | Clean, modern look; good for most fabrics. |
| 1.5 inches | 2 – 2.5 inches | Fold up ½ inch, then fold up remaining 1.5 – 2 inches. | Slightly more substantial hem, good for relaxed fits. |
| 2 inches | 3 inches | Fold up 1 inch, then fold up remaining 2 inches. | Generous hem, strong finish, classic denim look. |
| Preserving Original Hem | Varies (depends on original hem width + 0.5 inch for inner fold) | Fold raw leg edge ½ inch, then reattach original hem strip. | Authentic “factory hem” look. |
Remember, these are guidelines. You can adjust based on the thickness of your denim and your personal preference. For thinner or stretchier denim, a smaller hem allowance might be better.
Caring for Your Hemmed Jeans
Once your jeans are perfectly hemmed, you’ll want to keep them looking great. Proper care ensures the stitching and fabric longevity.
- Washing: Wash your jeans inside out in cold water on a gentle cycle. This helps protect the fabric and any embellishments or finishes.
- Detergent: Use a mild detergent. Avoid harsh chemicals or bleach. For keeping jeans looking newer longer, consider specific denim washes.
- Drying: Air drying is best for preserving the fit and color of your jeans. If you must use a dryer, use a low heat setting and remove them while slightly damp to prevent shrinkage and over-drying. Lay them flat or hang them to finish drying.
When it comes to washing denim, especially darker washes, it’s always a good idea to wash them separately for the first few times to prevent color bleeding onto other garments.
Frequently Asked Questions (FAQ)
Q1: How do I know how much fabric to cut off my jeans?
A1: Measure from the crotch to your desired length, then add your desired hem allowance (usually 1.5 to 3 inches for a double fold). This total measurement is where you’ll cut.
Q2: Can I hem jeans without a sewing machine?
A2: Yes, absolutely. A strong sewing machine makes the job faster and the stitches more durable, but you can achieve a neat hem by hand using a blind hem stitch. Ensure you use a strong thread and take small, even stitches.
Q3: What kind of needle should I use for denim?
A3: For a sewing machine, a denim needle (also called a jeans needle) or a universal needle of size 90/14 or 100/16 is recommended. These are thicker and stronger to pierce through multiple layers of denim.
Q4: How do I make my hem look professional?
A4: The key to a professional look is pressing well at each folding stage and sewing a straight, consistent stitch close to the inner folded edge. Preserving the original hem also contributes to a factory-like appearance.
Q5: My jeans are made of stretchy denim. How does that affect hemming?
A5: Stretch denim can be tricky because it might stretch as you sew. Try using a longer stitch length and a ballpoint or stretch needle. Sew slowly and avoid pulling or stretching the fabric as you guide it through the machine. A zigzag stitch or special stretch stitch can also be used for greater flexibility.
Q6: Can I hem ripped or distressed jeans?
A6: Yes, you can hem ripped or distressed jeans. You’ll need to decide if you want to preserve the rips or hem above them. If preserving them, carefully cut around the distressed areas


