


Quick Summary: Learn how to hem relaxed jeans easily at home. This guide provides clear, step-by-step instructions for beginners to achieve a professional-looking finish, ensuring your favorite relaxed-fit jeans always fit perfectly. No more dragging hems!
How To Hem Relaxed Jeans: Essential Step-by-Step Guide
Do your relaxed jeans feel a little too long, dragging on the floor and looking a bit sloppy? It’s a common problem, especially when you find that perfect pair with the relaxed fit you love. You don’t need to be a sewing expert or visit a tailor. With a few simple tools and this easy-to-follow guide, you can adjust your jeans to the ideal length, making them look custom-made. We’ll walk you through everything, from gathering your supplies to the final stitch, so you can feel confident about your DIY hemming project.
Why Hemming Relaxed Jeans Matters

Jeans are a staple in almost everyone’s wardrobe, and relaxed-fit styles have gained immense popularity for their comfort and effortless cool. However, their looser cut can sometimes mean a longer inseam. An ill-fitting hemline can make even the most stylish jeans look unkempt, tripping hazards, or simply not as flattering as they could be.
Properly hemming your relaxed jeans can:
- Improve the overall look and silhouette of your jeans.
- Prevent fraying and damage to the fabric from dragging.
- Enhance comfort by removing excess material that gets in the way.
- Give your jeans a more polished, tailored appearance.
- Save you money by allowing you to alter existing items instead of buying new ones.
Gathering Your Hemming Essentials
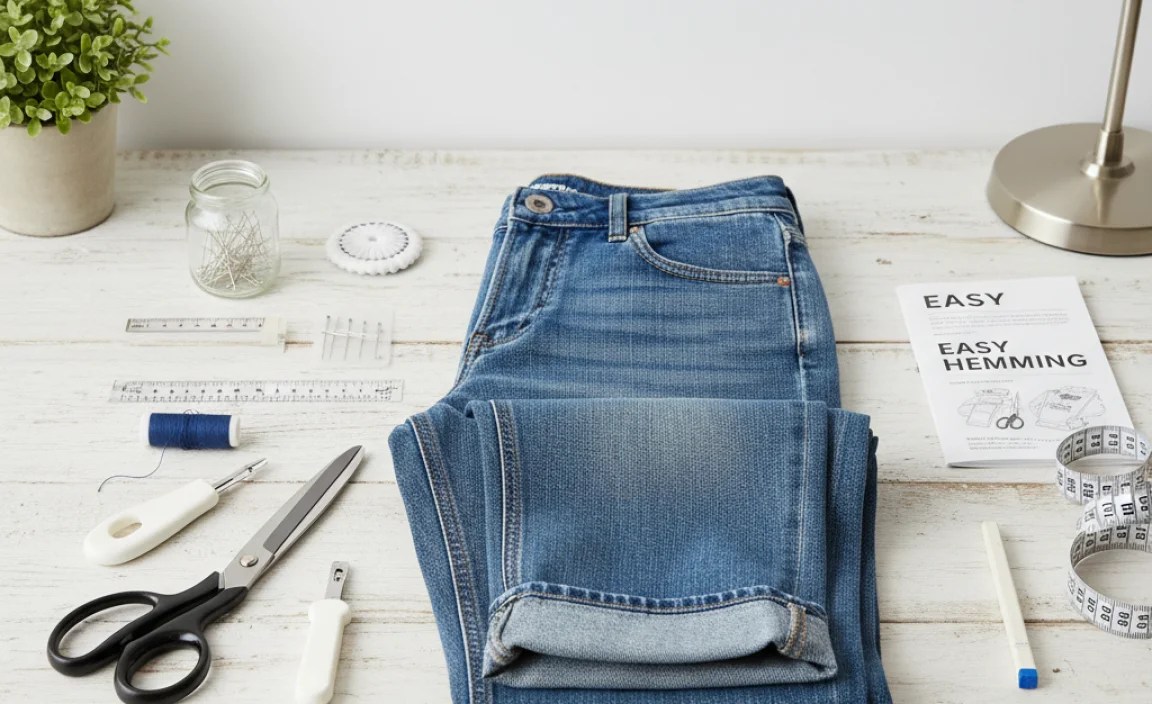
Before you start, make sure you have the right tools. This will make the process smoother and lead to a better result. Don’t worry if you don’t have professional sewing equipment; most of these items are readily available at fabric stores or even around your home.
Essential Tools and Materials:
- Your relaxed jeans
- Fabric scissors or rotary cutter and mat
- Measuring tape or ruler
- Fabric chalk or a washable fabric marker
- Straight pins
- Sewing machine (optional, but recommended for durability) OR a needle and strong thread
- Matching thread color
- Seam ripper (optional, for removing original hem if desired)
- Iron and ironing board
Step-by-Step Guide to Hemming Relaxed Jeans

Let’s get started! This guide covers the most straightforward method for hemming, aiming to preserve the original look of your jeans where possible.
Step 1: Measure and Mark Your Desired Length
This is the most crucial step to ensure your jeans fit perfectly. Wear the shoes you’ll most commonly wear with your relaxed jeans to get an accurate measurement.
- Put on your jeans.
- Stand in front of a mirror.
- Using a tape measure, start from the crotch seam and measure down the inseam to where you want the new hem to fall. For relaxed jeans, you might want them to just skim the top of your shoes or slightly above.
- Once you have your desired length, use fabric chalk or a washable marker to make a small dot at that point on the inside of one leg’s inseam.
- Remove the jeans.
- Lay the jeans flat on a table or the floor. Line up the inseam of the second leg with the first leg, ensuring they are perfectly aligned.
- Transfer the mark from the first leg to the second leg, maintaining the exact same measurement from the crotch.
- Now, decide how much fabric you want to fold up for the hem. A common hem allowance is about 1 to 1.5 inches.
- On both legs, measure from your initial marked dot down by your chosen hem allowance (e.g., 1.5 inches) and make a new, longer mark. This is your cutting line.
- Draw a straight line connecting these new marks all the way across the bottom of each leg. This line will be where you cut.
Tip: If you want to keep the original hem look of your jeans (the slightly frayed or thicker cuff), you can opt for a method that preserves or recreates this. For this guide, we’ll assume you’re creating a clean, new hem. If you want to maintain the original hem, you’ll carefully unstitch the original hem, cut your denim to the desired length, and then reattach the original hem to the new length. This is a bit more advanced.
Step 2: Cut Off Excess Fabric
Accuracy here prevents a crooked hem and ensures both legs are the same length.
- Lay one leg of the jeans flat on your cutting surface. Ensure the fabric is smooth and the chalk line is clearly visible.
- Using sharp fabric scissors or a rotary cutter, carefully cut along the marked line you drew in Step 1. Cut through both layers of the fabric.
- Repeat the process for the second leg, making sure to cut at the exact same height as the first.
Pro Tip from Paul: Consider saving the fabric scraps you cut off! They can be useful for small mending projects later on.
Step 3: Prepare the Hem (Fold and Press)
Pressing the fabric before sewing creates crisp folds that make stitching much easier and neater.
- Take one cut leg and fold the raw edge up. The raw edge should be folded towards the inside of the pant leg.
- Align the raw edge with the folded edge you just created. This makes your first fold clean. Fold this up again, by about 0.5 to 0.75 inches towards the inside of the pant leg. This will neatly enclose the raw edge.
- Press this fold firmly with your iron. This creates a clean, double-folded hem.
- Pin the folded hem in place. Insert straight pins perpendicularly through the folded fabric, spacing them about 1-2 inches apart. This keeps the hem secure while you sew.
- Repeat steps 1-4 for the second leg, ensuring both hems are folded and pinned identically.
Step 4: Sew the Hem
This is where you secure your new hem. You have two main options: sewing machine or hand-sewing.
Option A: Using a Sewing Machine
This is the fastest and most durable method.
- Thread your sewing machine with thread that matches your jeans. A slightly heavier-duty thread, like a polyester or denim thread, is recommended for durability.
- Set your sewing machine to a straight stitch. A stitch length of 2.5 to 3mm is usually good for denim.
- Position the first leg under the sewing machine’s presser foot, with the pinned hem edge aligned just below the needle.
- Sew as close as possible to the inner folded edge of the hem. You’ll be sewing through all layers of the folded hem.
- Start sewing a few stitches, then backstitch to secure the beginning of your seam. Continue sewing around the entire leg, maintaining a consistent distance from the folded edge.
- When you reach the beginning, backstitch again for a few stitches to secure the end of your seam.
- Trim any excess threads.
- Repeat the sewing process for the second leg, ensuring you start and end with backstitches and keep the stitching line consistent with the first leg.
Option B: Hand-Sewing the Hem
If you don’t have a sewing machine, this is perfectly doable. Use a strong needle and double your thread (tie a knot at the end). A blind hem stitch or a simple running stitch works well.
- Thread your needle with matching thread and tie a knot at the end.
- Start at the inseam of one leg of the pinned hem. Insert the needle from the inside of the pant leg, so the knot is hidden.
- Make small, even stitches. You can use a blind hem stitch for an almost invisible finish, or a simple running stitch or whip stitch around the edge of the folded hem. Aim for stitches about 1/4 inch long, taking care to catch just a little bit of the fabric from the folded edge.
- Continue stitching all the way around the leg.
- When you get back to your starting point, make a few extra stitches and tie a secure knot to finish. Trim excess thread.
- Repeat for the second leg.
Step 5: Final Press and Check
A final press makes everything look neat and professional.
- Turn your jeans right-side out.
- Check the stitches to ensure they are secure and even.
- Press the hem one last time with your iron, focusing on creating a sharp, clean line. If you used a sewing machine, press the seam flat on the outside. If you hand-sewed with a blind stitch, pressing will help it lay flat.
- Try on your perfectly hemmed relaxed jeans!
Maintaining the Original Look (Optional Advanced Technique)

For those who love the authentic, slightly fraying or thicker hem typically found on jeans, you can attempt to preserve the original cuff. This involves carefully detaching the original hem, cutting the jean leg to your desired length, and then reattaching the original hem.
Steps to Preserve Original Hem:
- Unpick the Original Hem: Using a seam ripper, carefully unpick the stitches holding the original hem to the leg of the jeans. You want to detach the hem band itself, leaving the rest of the jean leg intact. Work slowly to avoid damaging the fabric.
- Measure and Cut: With the original hem detached and the pant leg laid flat, determine your new desired length. Measure from that point down to the bottom of the original hem band. Cut off the excess fabric from the bottom of the pant leg, ensuring you leave enough seam allowance on the original hem band to reattach it.
- Reattach the Original Hem: Pin the original hem band back onto the newly cut leg opening. Make sure the raw edges align and the hem is smooth. You can then sew it in place either by machine or hand, roughly where the original stitches were.
This method requires more patience and precision but results in a hem that looks factory-original.
How to Hem Different Types of Relaxed Jeans

The basic principles apply to most relaxed jeans, but here are some considerations for different styles:
Wide-Leg Jeans
Wide-leg relaxed jeans often require a bit more fabric to be trimmed. Ensure your cuts are perfectly straight to maintain their dramatic silhouette. A slightly longer hem can look good with wide-leg styles, especially when paired with boots or chunky heels. Because there’s more fabric, consider using a heavier-duty thread for sewing.
Boyfriend/Mom Jeans
These relaxed fits are common. The hemming process is straightforward. If you’re going for a more casual, slightly cropped look, remember that rolled cuffs can also be an easy alternative to permanent hemming, offering flexibility.
Distressed/Raw Hem Jeans
If your relaxed jeans already have a distressed or raw hem, you might choose to simply cut them to length and leave them as is. For a controlled raw hem, cut to your desired length, then intentionally fray the edge by washing them a few times or gently pulling threads. You can also secure the hem by sewing a line of stitches just above the cut line to prevent further unraveling.
Troubleshooting Common Hemming Issues
Even with careful work, you might encounter minor hiccups. Here’s how to handle them.
Uneven Hem:
Cause: Fabric shifted during cutting or sewing, or initial marking was uneven.
Solution: If it’s just slightly uneven and you used a sewing machine, you might be able to carefully go back and adjust. For manual hemming, you might need to unpick and re-pin. If it’s significantly uneven or you’ve hand-sewed, consider cutting them shorter to an even length or opting for a more dramatic distressed hem. Always check alignment with a tape measure.
Stitches Looping or Breaking:
Cause: Incorrect tension on the sewing machine, wrong needle, or weak thread.
Solution: Consult your sewing machine’s manual for tension settings. Ensure you are using a needle appropriate for denim (a denim or universal needle, size 80/12 or 90/14) and strong thread. Test on scraps first.
Wavy Hemline:
Cause: Fabric stretching while sewing, especially with knit denim or if you pulled too hard on the fabric.
Solution: Be gentle and avoid stretching the fabric as you sew. If you’ve already sewn it, a good, firm press with your iron can often help flatten it out. For severe waves, unpicking and trying again with a lighter touch might be necessary.
Comparing Hemming Methods: A Quick Look
Here’s a simple comparison to help you choose:
| Method | Pros | Cons | Best For |
|---|---|---|---|
| Sewing Machine (New Hem) | Durable, fast, neat finish. | Requires a sewing machine. | Most denim types, quick results. |
| Hand-Sewing (New Hem) | Accessible (no machine needed), discreet stitches possible. | Time-consuming, stitches may be less durable than machine. | Beginners, those without a machine, quick fixes. |
| Preserving Original Hem | Authentic, factory-original look. | Requires careful unpicking and reattaching, more complex. | Vintage jeans, achieving a specific aesthetic. |
| Raw/Distressed Hem | Effortless, casual look, no sewing required. | Can fray excessively if not managed, not suitable for all styles. | Trendy styles, very casual outfits. |
Frequently Asked Questions About Hemming Jeans
Q1: How much fabric should I leave for the hem allowance?
A: Typically, 1 to 1.5 inches is a good hem allowance. This allows for a double fold, which encloses the raw edge and creates a clean finish. For thicker denim or a more robust hem, you might go up to 2 inches.
Q2: Can I hem jeans without a sewing machine?
A: Absolutely! You can hand-sew the hem using a needle and strong thread. A blind hem stitch offers a nearly invisible finish, or a simple running stitch can also work. It takes more time but yields great results.
Q3: What’s the best way to measure for hemming?
A: Wear the shoes you’ll most often wear with the jeans. Put the jeans on and measure from the crotch seam down the inseam to your desired length. Then, mark where the new hem will be, usually by adding your hem allowance below that mark.
Q4: How do I prevent my jeans from looking “cuffed” after hemming?
A: To avoid a visible cuff line on the outside, fold the fabric inwards twice before sewing. For example, fold the raw edge up 0.5 inches, press, then fold again so the raw edge is enclosed, and press again. Sew along the bottom edge of this double fold.
Q5: My jeans are made of stretchy denim. How does that affect hemming?
A: Stretchy denim can be trickier because it can stretch out of shape as you sew. Use a walking foot on your sewing machine if possible, and be very gentle. Don’t pull or stretch the fabric as you guide it under the needle. A ballpoint needle might be suitable if the stretch is significant, but a denim needle is usually best for the fabric itself. Pressing with steam can help relax any wrinkles after sewing.
Q6: What kind of thread should I use for hemming jeans?
A: It’s best to use a strong, durable thread. A polyester thread, a cotton-wrapped polyester, or a specific denim thread is ideal. Matching the color of your jeans as closely as possible will give the neatest finish. For a topstitching effect on the outside, you can use a contrasting color thread.
Q7: How do I ensure both legs are the same length when hemming?
A: After marking the first leg, lay both legs flat and perfectly


