


Quick Summary: Learn how to hem relaxed jeans easily at home for a perfect fit. This guide provides clear, step-by-step instructions for a professional finish, whether you’re keeping the original hem or creating a new one. Get your favorite relaxed jeans looking just right, saving time and money.
How To Hem Relaxed Jeans: Your Essential Guide
Jeans are a wardrobe staple, and when they’re the perfect relaxed fit, they’re incredibly comfortable. But what happens when that perfect pair is just a little too long? A common frustration is a relaxed fit that drags on the floor, looking sloppy and potentially damaging the fabric. Don’t worry! Hemming your relaxed jeans is a straightforward process that can be done at home with basic supplies. This guide will walk you through everything you need to know to achieve a clean, professional-looking hem, ensuring your favorite jeans fit like a glove.
We’ll cover two main methods: preserving the original “distressed” hem and creating a clean, new hem. Both are achievable for beginners, and by the end, you’ll have the confidence to tackle any pair of jeans that need a little adjustment.
Why Hemming Relaxed Jeans is Important

A perfect fit isn’t just about comfort; it’s about how your clothes look and feel. Relaxed fit jeans are designed for comfort and a slightly looser silhouette, but when they’re too long, they lose their intended style. Excess fabric can:
- Make you appear shorter.
- Cause the hem to fray unevenly from dragging.
- Create a generally untidy appearance.
- Lead to tripping hazards.
Hemming them correctly ensures they maintain their relaxed style while looking polished and intentional. It’s a simple alteration that makes a big difference.
Tools and Materials You’ll Need

Before you begin, gather these essential items. Having everything ready will make the process smoother.
For Preserving the Original Hem:
- Your relaxed jeans
- Seam ripper
- Fabric scissors or a sharp rotary cutter and mat
- Measuring tape or ruler
- Fabric chalk or a washable marker
- Straight pins
- Iron and ironing board
- Matching thread (if needed)
- Sewing machine (optional, but recommended for durability) OR a needle for hand-sewing
For Creating a Clean New Hem:
- Your relaxed jeans
- Fabric scissors or a sharp rotary cutter and mat
- Measuring tape or ruler
- Fabric chalk or a washable marker
- Straight pins
- Iron and ironing board
- Thread the color of your jeans
- Sewing machine (recommended) OR a needle for hand-sewing
It’s important to use sharp scissors or a rotary cutter to ensure a clean cut that won’t snag or fray the denim unnecessarily. For a professional finish, a sewing machine will provide a durable and neat stitch.
Method 1: Preserving the Original Distressed Hem

Many of us love the slightly worn, frayed look of the original hem on relaxed jeans. This method lets you keep that character while shortening the length. It requires a bit more patience but is achievable.
Step 1: Prepare Your Jeans
Put on your jeans and stand in front of a mirror, or have a friend help you. Determine your desired length. Mark the new hemline with fabric chalk or a washable marker. A good rule of thumb is to mark where you want the bottom of the jean to hit, considering how the denim will fall.
Step 2: Remove the Original Hem
Carefully lay your jeans flat on a protected surface. Using a seam ripper, gently pull out the stitches holding the original hem. Work slowly to avoid damaging the fabric. You’ll see a line of thicker, often contrasting thread – that’s what you’re removing. Once all the stitching is undone, you should be able to unroll the original hem. Be careful not to separate the thicker “outseam” threads if you want to preserve that frayed look.
Step 3: Trim if Necessary
Once the original hem is unrolled, you might find that the fabric is uneven or excessively frayed beyond what you want. If this is the case, you can carefully trim the excess fabric to create a more uniform edge. Measure from the seam where the hem was attached up to your desired new hem length. Mark this line and trim carefully. Aim to leave about 1-1.5 inches of fabric below the original seam line, which will become your new “rolled” hem.
Step 4: Create the New Distressed Edge
Now, you need to create the distressed effect if it wasn’t naturally preserved. You can do this by:
- Gently pulling threads: Use tweezers or the tip of your seam ripper to carefully pull out horizontal denim threads. Work from the cut edge inwards. This creates a fringe.
- Rubbing with sandpaper: Lightly rub the cut edge with coarse-grit sandpaper to encourage fraying.
- Washing and drying (with caution): If you plan to wash them again soon, the washing machine will naturally fray the edges. However, be aware this can make the fraying less controlled.
The goal is a fringe that mimics the original look. You can control the length of the fringe by how many threads you pull and how deep you go.
Step 5: Re-attach the Original “Distressed” Part (Optional, for a fuller look)
If you want a slightly thicker, more substantial “original” hem appearance rather than just a fringe, you can re-attach the previously unrolled hem. Fold the raw edge up about 1/2 inch to create a clean edge, then fold it up again to meet the original seam line. Pin in place. Stitch this folded edge down very close to the folded edge using a sewing machine or by hand. This essentially creates a new, shorter hem that sits just above where the original hem was, with the fringe hanging below.
Step 6: Finishing Touches
Try on your jeans to check the length and the distressed effect. Adjust the fringe as needed. For a cleaner finish to the fringe, you can add a zigzag stitch or a serger stitch along the top edge of the fringe to prevent it from unraveling further up the leg.
Method 2: Creating a Clean New Hem
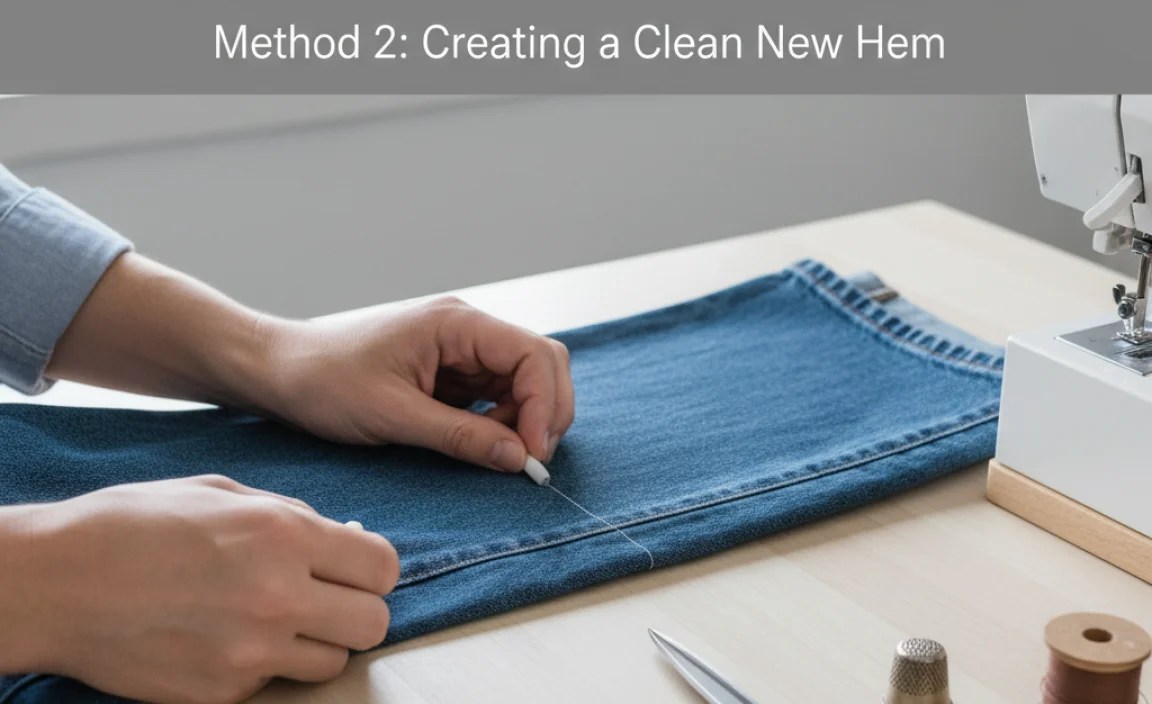
If you prefer a crisp, finished hem rather than a distressed one, this method is for you. It’s cleaner, more traditional, and often preferred for a more polished look.
Step 1: Measure and Mark
Lay your relaxed jeans flat. Put them on (or have someone help) to determine the precise length. Mark the desired hemline with fabric chalk. Remember to account for the hem allowance – typically 1 inch to 1.5 inches for denim. For example, if you want the jeans to end at your ankle bone, mark that spot, then mark another line 1.5 inches above it. This second line is where you will cut.
Step 2: Cut the Excess Fabric
Using sharp fabric scissors or a rotary cutter, cut along the second line you marked (the one 1.5 inches above your desired finished hemline). Ensure the cut is as straight and even as possible all the way around the leg. If you’re unsure about cutting while wearing, measure carefully, fold the jeans leg at the marked hemline, and use that fold as a guide for cutting.
Step 3: Prepare the Hem Allowance
On each leg, fold the raw edge up towards the inside of the pant leg by 1/2 inch. Press this fold firmly with an iron. This creates a clean edge to work with for the next fold.
Step 4: Fold and Press Again
Now, fold the already-folded and pressed edge up again by about 1 inch (if you allowed for 1.5 inches total). This second fold encases the raw edge completely. Press this second fold firmly with the iron. Pin the hem securely in place using straight pins, ensuring the pins are perpendicular to the edge for easy removal while sewing.
Step 5: Sew the Hem
Using a sewing machine, set it to a straight stitch. Use a sturdy needle appropriate for denim (a “denim” or “jeans” needle, size 100/16 or 110/18 is ideal). Choose a thread color that matches your jeans. Sew along the top edge of the folded hem, close to the edge, removing pins as you go. Go slowly, especially over thick seams. To reinforce the stitch, you can sew over the hemline a second time, or use a slightly longer stitch length for a more traditional look.
For hand-sewing: Use a backstitch for durability. Make small, even stitches, ensuring you catch both layers of the folded hem. A thimble can be very helpful here.
Step 6: Finishing
Once both legs are sewn, trim any excess threads. Give the hem a final press with the iron. For an even more authentic look, you can use a contrasting thread (like the original thread color) on the outer side of the hem, or even a doubled stitch like some jeans brands use.
Pro Tip: If your jeans have a slight flare or bootcut, ensure the hem is straight and even when the pant leg is laid flat. You might need to adjust the length slightly to account for the way the fabric hangs.
Keeping the Original Stitch Color

Many jeans feature contrasting stitching, often gold or orange. If you’re sewing a new hem and want to maintain this look, here’s how:
- Machine Stitching: Use a contrasting thread in your bobbin and a matching thread in your needle, or vice-versa, depending on whether you want the contrast on the inside or outside. Alternatively, change both top and bobbin threads to the contrasting color for a double-sided effect.
- Hand Stitching: Use the contrasting thread for your hand-sewing.
For preserving the original hem, you’re generally keeping the original threads. If you need to secure a loose thread, match its color as closely as possible.
When to Consider Professional Hemming
While home hemming is rewarding, there are times when professional help might be best:
- Very expensive or delicate denim: If the jeans are a high-value designer item or made of particularly delicate fabric, you might want an expert’s touch.
- Complex finishes: Jeans with intricate embroidery, unique washes, or very specific distressing patterns might be harder to replicate at home.
- Lack of confidence or time: If you’re pressed for time or just don’t feel comfortable tackling the project yourself, a tailor can provide a perfect finish.
- Specific pant shapes: While relaxed jeans are generally forgiving, hemming very wide-leg or extremely tapered styles might require more precision.
A professional tailor can often achieve a seamless result. The cost of professional hemming is typically between $10-$30 per pair, which can be well worth it for a perfect finish on a treasured pair of jeans. For resources on finding a good tailor, you might consult local directories or even look for reviews online. Organizations like the Alliance for American Textiles sometimes have directories or information on textile professionals, though specific local tailor recommendations are usually found through community searches.
Understanding Denim Weight and Thread
Denim comes in various weights, affecting how it drapes and how easy it is to sew.
Denim Weight Categories:
| Category | Weight (oz/yd²) | Characteristics |
|---|---|---|
| Lightweight | 4-10 oz/yd² | Soft, drapes well, often used for summer jeans or shirts. Easier to cut and sew. |
| Midweight | 10-14 oz/yd² | The most common for jeans. Durable yet comfortable, good balance. |
| Heavyweight | 14-20+ oz/yd² | Sturdy, durable, takes time to break in. Requires stronger needles and potentially slower sewing. |
When hemming relaxed jeans, you’re likely working with midweight to heavyweight denim. Using the correct needle and thread is crucial. Standard cotton thread might not be strong enough. Polyester or polyester-cotton blend threads offer better durability for denim. A denim needle will pass through the thick fabric more easily, preventing skipped stitches and thread breakage. The Georgia Tech’s Institute of Textile Technology provides extensive research on textile properties and construction, which underpins why these specific tools are essential for working with durable fabrics like denim.
Troubleshooting Common Hemming Issues
Even experienced sewers can run into snags. Here are solutions to common problems:
- Jeans are uneven after hemming: This usually happens if the initial cutting or marking was uneven. If it’s a clean new hem, you might be able to carefully unpick and re-sew. For distressed hems, slight unevenness in the fringe can sometimes be part of the charm, but significant differences might require re-cutting and re-fraying.
- Skipped stitches on the sewing machine: Ensure you’re using a denim/jeans needle that’s the correct size (usually 100/16 or 110/18) and that it’s not bent or dull. Check that your thread is appropriate for denim and that the machine is threaded correctly.
- Thread breaking: Your needle might be too small, dull, or bent. Or, the thread quality might be too low. Slow down your sewing speed. For very thick seams, you might need to manually help the machine’s presser foot over the bulk by turning the handwheel forward.
- Fabric bunching or puckering: This can be due to too much tension on the thread, the needle not penetrating the fabric properly, or sewing too quickly. Adjust your machine’s tension settings, use a sharper or larger needle, and sew at a steady, controlled pace.
- Difficulty with thick waistband or seams: For areas where the fabric is very thick, you can sometimes flatten it with your iron to reduce bulk. If using a sewing machine, you can manually help the needle over the hump by turning the handwheel towards you. Some machines have a “hump jumper” or “jean” stitch plate that helps maintain an even sewing height.
Don’t be discouraged if your first attempt isn’t perfect. Practice makes perfect, and even slightly imperfect homemade hems can look great and function perfectly well.
FAQ: Hemming Relaxed Jeans
Q1: How much length should I allow for hemming jeans?
Generally, allow 1 to 1.5 inches for a clean new hem. This provides enough fabric for a double fold that keeps the raw edge hidden and creates a sturdy hem. For preserving an original distressed hem, you might need to leave more fabric to recreate the original frayed look.
Q2: Can I hem jeans without a sewing machine?
Yes! While a sewing machine makes the process faster and the hem more durable, you can absolutely hem jeans by hand. Use a strong thread and a backstitch for the most secure result. It will take longer but can look very neat.
Q3: How do I keep the original thick stitching on my jeans when hemming?
When preserving the original distressed hem, the thick stitching is usually on the outside edge of the folded hem. You’ll typically unpick the stitches that hold the folded hem up, then re-roll and re-stitch. If you’re trying to preserve the “selvedge” line (often a colored thread along the outer seam), be extra careful not to cut it when unpicking or trimming.
Q4: My jeans are heavily distressed. How do I hem them without losing the look?
This is where preserving the original hem method comes in. Instead of cutting off the distressed part, you unpick the stitching that holds it in place, then carefully re-roll and re-stitch the jeans to a shorter length, letting the original distressed edge become the new hem. You might need to carefully pull some threads to extend the fraying if it got cut off.
Q5: How do I make sure both jean legs are the same length?
The best way is to measure carefully while the jeans are laid flat and the fabric is smooth. You can also use a tailor’s chalk or washable marker with a ruler and carefully measure from the crotch seam down to where you want the hem to fall on both legs to get an accurate starting point. If hemming while wearing, have a friend with a keen eye for detail check them in a mirror.
Q6: What if my relaxed jeans have a slight flare?
When hemming flared or bootcut jeans, it’s crucial to lay them flat and smooth out any wrinkles to ensure the hem is straight. The length might appear different when


