


Need to shorten your tapered jeans without ruining them? This essential air-dry guide shows you exactly how to hem tapered jeans at home, ensuring a perfect fit and preserving the fabric’s integrity. Get that custom look easily!
Tapered jeans offer a stylish, modern silhouette, but finding the perfect length can be a challenge. Too long, and they bunch awkwardly at your ankles; too short, and they might look a little off. If you’ve ever found yourself frustrated by ill-fitting jeans, you’re not alone. Many people shy away from hemming their favorite denim, worried about making a mistake or damaging the fabric. The good news is, with a little guidance and the right approach, you can achieve a professional-looking hem on your tapered jeans right at home, and crucially, without the risk of shrinkage or damage from heat. This guide will walk you through everything you need to know, focusing on a gentle, air-dry method.
We’ll cover the essential tools, a simple step-by-step process, and tips to ensure your tapered jeans get the perfect fit and care they deserve. Get ready to transform your denim and step out in confidence!
Why Hemming Tapered Jeans is Different

Tapered jeans have a unique shape that requires a bit more attention when hemming compared to straight-leg or bootcut styles. The leg gradually narrows from the knee down to the ankle, meaning the hem you create needs to respect this shape. If you simply cut and hem them straight across without considering the taper, the bottom cuff can end up looking a bit boxy or uneven when worn. The goal is to maintain that clean, modern line of the taper all the way down to the new hem.
Furthermore, denim is a sturdy fabric but can be sensitive to heat and harsh treatments, especially during the drying process after hemming. This is why focusing on an ‘air dry only’ method is crucial for preserving the fit, texture, and integrity of your beloved jeans. It’s a gentle approach that ensures your hard work doesn’t get undone by a hot dryer.
Gathering Your Essential Tools
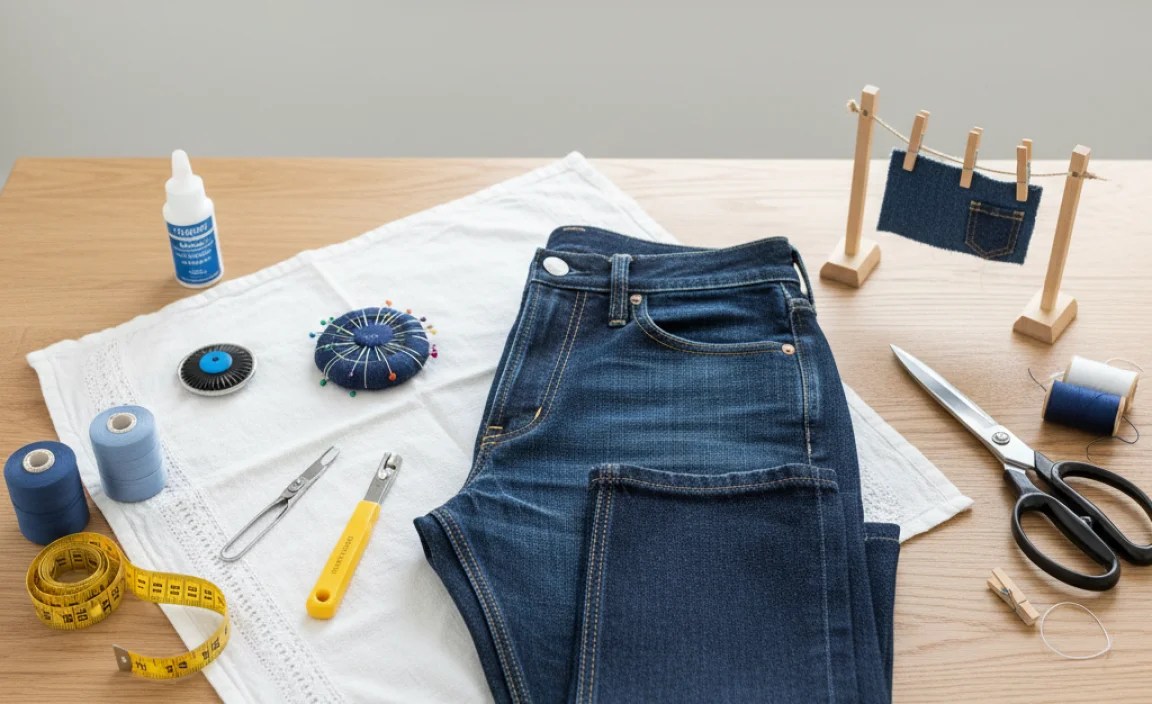
Before you begin, having the right tools makes the entire process smoother and more accurate. Don’t worry, you likely have most of these items already, or they are easily obtainable.
What You’ll Need:
- Your Tapered Jeans: Of course, the stars of the show! Make sure they are clean and dry.
- Fabric Scissors: Sharp scissors specifically for fabric are essential for clean cuts. Dull scissors can lead to jagged edges that are hard to fix.
- Fabric Measuring Tape: A flexible measuring tape is perfect for measuring inseams and circumferences accurately.
- Fabric Chalk or Disappearing Ink Pen: To mark your cutting and sewing lines directly on the fabric.
- Pins: To hold the fabric in place while you prepare to sew.
- Sewing Machine (Optional, but recommended): For a durable and professional-looking hem. A sewing machine with a denim needle will be most effective.
- Heavy-Duty Needle and Thread (If sewing by hand): Choose a thread that matches your jeans as closely as possible. A strong needle is necessary for denim.
- Seam Ripper: If you plan to reuse the original hem for a more authentic look.
- Iron and Ironing Board: To press seams flat and ensure a crisp finish.
- A Flat Surface: For accurate measuring and marking.
Preparing Your Jeans for Hemming

Proper preparation is key to a successful hemming job. This ensures you’re working with a clean canvas and that your measurements will be precise.
First, ensure your tapered jeans are clean and completely dry. Never try to hem wet jeans, as the fabric can stretch unpredictably, leading to inaccurate measurements and a potentially uneven hem. Lay your jeans flat on a clean, hard surface. Smooth out any wrinkles to get the most accurate silhouette.
Next, decide how much length you want to remove. It’s always better to remove less initially and adjust if needed. A common mistake is cutting off too much at once. As a general rule, aim to remove about half an inch to an inch more than your desired final length to account for the hem fold.
Tip: Try on your jeans with the shoes you most commonly wear them with. This is the best way to judge the perfect length and see how the fabric drapes.
Step-by-Step: Hemming Your Tapered Jeans (Air Dry Focus)

This guide focuses on a simple, effective method for hemming tapered jeans, emphasizing an air-dry finish to protect the fabric.
Step 1: Determine Your Desired Length
Put on your tapered jeans and the shoes you’ll wear with them. Stand in front of a mirror. Hold the jeans at the point where you want the hem to end. Use a pin to mark this new length on the outside of one leg. Ensure the jeans hang straight and the taper isn’t distorted. If the jeans have a cuff, you might want to unroll it to get a true measurement of the original length first.
Step 2: Mark the Cutting Line
Once you have your desired final length marked with a pin, take the jeans off and lay them flat. Measure from the pin down to the original bottom hem. Add the amount you want for your new hem allowance. A standard hem allowance for denim is usually between 1 and 1.5 inches. This is the space you’ll fold up to create the new hem. Mark this cutting line clearly with your fabric chalk or disappearing ink pen all the way around the leg. For tapered jeans, ensure this line follows the natural curve of the fabric.
Important: To ensure both legs are perfectly even, measure the inseam (from the crotch seam to the marked cutting line) for each leg and make sure they match. Alternatively, after marking one leg, you can fold the jeans in half carefully, aligning the seams, and use the first leg as a guide to mark the second.
Step 3: Cut the Excess Fabric
Lay the jeans flat, with the leg you’re working on smoothed out and the cutting line clearly visible. Using your sharp fabric scissors, carefully cut along the marked cutting line. Take your time to ensure a straight, clean cut. Remember, you can always cut more off, but fabric can’t be added back! It’s wise to leave slightly more fabric than you think you’ll need for the hem allowance initially.
Step 4: Prepare the New Hem
Now it’s time to create the folded hem. There are two main methods:
Method A: Simple Folded Hem (Easiest)
Turn the jeans inside out. Fold the raw edge of the fabric up by about 0.5 inches towards the inside of the leg. Press this fold firmly with your iron. This small fold creates a clean edge to work with. Then, fold the fabric up again to meet your desired new hem length. You’ll be folding the fabric twice. Press this second fold firmly. The total width of this double fold will be your hem allowance (e.g., 1 to 1.5 inches).
Method B: Recreating the Original Hem (More Authentic Look)
This method involves carefully unpicking the original hem using a seam ripper. Keep the original seam intact. Lay the original hem flat and measure its width. Measure this width from the raw edge of your cut jeans (which is now about 1-1.5 inches shorter than the original hem’s starting point). Fold the raw edge up this measured amount and press. Then, place the unpicked original hem over this folded edge, aligning them perfectly. Pin in place.
Why Method B? Reattaching the original hem preserves the worn look and color variations often found on a jean’s original cuff, giving your hem a more factory-made appearance. For tapered jeans, ensure the original hem you’re reattaching also follows the taper correctly.
Step 5: Pin the Hem in Place
Once you’ve made your folds according to your chosen method (Method A or B), pin the hem securely in place. Use plenty of pins, placed about every inch or two apart, to hold both layers of fabric flat against the leg. This prevents shifting when you sew.
Step 6: Sewing the Hem
You have two options here: sewing machine or hand sewing.
Using a Sewing Machine:
Select a denim needle and a strong thread that matches your jeans. Set your machine to a straight stitch, and if possible, adjust the stitch length to be slightly longer than usual for tough fabrics like denim (around 2.5-3mm). Sew as close to the folded edge as possible. Go slowly, especially at the seams where the fabric is thicker. Backstitch at the beginning and end of your seam to secure it. For tapered jeans, you might need to navigate the changing width of the leg; consider sewing from the bottom up for better control.
See Brother’s guide on sewing denim for more machine tips.
Sewing by Hand:
Use a heavy-duty needle and strong thread. A backstitch is recommended for durability. Sew through both folded layers of the hem, following the edge of the folded fabric. Aim for consistent stitch length and tension. It will take longer than machine sewing, but good results are achievable.
Step 7: Finishing Touches and Air Drying
After sewing, remove all the pins. Trim any loose threads. You can lightly press the hem again to set the seam. Now comes the crucial part: air drying. Hang your newly hemmed tapered jeans on a clothesline or a sturdy hanger. Ensure they are hanging straight and allow them to dry completely in a well-ventilated area, away from direct sunlight or heat sources like radiators. This prevents the fabric from shrinking or the stitching from pulling unevenly. Do not put them in a clothes dryer.
Once completely dry, try them on. If you’re happy with the length and the fit, you’re done! If you feel they need to be slightly shorter, you can repeat the process, removing a little more length.
Can I Hem Tapered Jeans Without Sewing?

Yes, there are a few no-sew options available, although they may not be as durable or look as professional as a sewn hem. These are great for quick fixes or if you don’t have sewing equipment.
No-Sew Hem Tapes (Fusible Webbing)
This is a popular method. You’ll need fusible hemming tape, such as Hemline’s hemming web tape, and an iron. Fold your hem as you would for a sewn version, place the fusible tape inside the fold, and press with a hot iron (follow the tape’s instructions). The heat activates the adhesive, bonding the fabric. Ensure the iron is on a setting appropriate for denim and that you press for the recommended time.
Fabric Glue
Fabric glue is another option. Apply a thin, even layer to the inside of your folded hem, press the layers together, and allow it to dry completely. This method can be less predictable for denim, as the glue might stiffen the fabric or not hold up through many washes.
Fabric Staples or Pins
For a very temporary fix, you can use strong fabric staples or even stylish safety pins on the inside of the hem. This is not a permanent solution and is best for emergencies.
Note: No-sew methods can sometimes be less durable, might fall apart in the wash, or not provide the crisp finish of a sewn hem. Always test on a scrap piece of fabric if possible.
Maintaining Your Hemmed Tapered Jeans
Proper care after hemming ensures your jeans continue to look great and the hem stays intact.
Washing: Always wash your jeans inside out to protect the outer fabric and seams. Use a gentle cycle with cold water. This is less harsh on the denim and less likely to cause shrinkage or fading around the new hem. Avoid using bleach.
Drying: As emphasized throughout, always air dry your jeans. Hang them to dry naturally. This is critical for preserving the shape, preventing shrinkage, and ensuring the threads and fabric around the hem don’t warp. Avoid direct strong sunlight if you want to minimize fading.
Ironing: If your jeans become wrinkled, iron them inside out on a medium heat setting. Avoid ironing directly over any embellishments or heavy stitching.
Pro Tips for a Perfect Tapered Jean Hem
Here are a few extra tips to elevate your hemming game:
- Use Matching Thread: For a seamless look, use thread that matches the color of your jeans. For a more classic denim look, a subtly contrasting thread (like a golden-brown) can mimic factory-made jeans, especially if you’re reattaching the original hem.
- Pre-Wash Your Jeans: If your jeans haven’t been washed before, it’s a good idea to wash and dry them (using the air-dry method) before hemming. This allows the fabric to settle into its natural state, preventing shrinkage and altering the length after you’ve already hemmed them.
- Consider the Original Hem: If your tapered jeans have a distinctive original hem (e.g., with whiskers or a specific color fade), unpicking and reattaching it can give you a more authentic, professional finish that’s hard to replicate.
- Pressing is Key: Don’t skip ironing! Pressing at each folding stage of the hem makes it much easier to sew a clean, straight line. It also gives the finished hem a sharper, more polished look.
- Test Your Sewing Machine: If using a sewing machine, test your stitch on a scrap piece of denim first to ensure the tension and stitch length are correct. Some machines have a specific setting or require a longer stitch for denim.
Understanding Denim Fabric and Shrinkage
Denim is typically made from cotton, and cotton is a natural fiber that can shrink when exposed to heat and moisture. This is why a careful drying process is so important.
Why Air Drying is Best:
- Prevents Shrinkage: Heat from a dryer causes cotton fibers to contract, leading to a shorter garment. Air drying eliminates this risk.
- Maintains Fit: It helps the fabric retain its original shape and drape, especially important for the calibrated taper of your jeans.
- Preserves Color: Intense heat can sometimes cause certain dyes to fade or bleed. Air drying is gentler on the color.
- Protects Threads: High heat can also weaken stitching over time.
The Federal Trade Commission (FTC) offers general textile care advice, emphasizing that following care labels is always recommended, and for denim, gentler methods are usually best.
Table: Hemming Method Comparison
Here’s a quick comparison to help you choose the best hemming method:
| Method | Pros | Cons | Best For |
|---|---|---|---|
| Sewn Hem (Machine) | Durable, professional finish, strong hold | Requires sewing machine, practice may be needed | Long-term wear, custom fit |
| Sewn Hem (Hand) | Durable, strong hold, no machine needed | Time-consuming, can be less consistent than machine | Those without machines, small adjustments |
| No-Sew Hem Tape (Fusible Web) | Quick, easy, no special skills needed, clean look | May not be as durable as sewing, can sometimes come undone | Beginners, temporary hemming, quick fixes |
| Fabric Glue | Fast, simple | Can stiffen fabric, durability issues, may not look neat | Very temporary fixes, non-critical garments |
| Recreating Original Hem | Authentic look, preserves original styling | Requires seam ripper, more detailed work | Those wanting a factory-made appearance |
Frequently Asked Questions (FAQ)
Q1: How much length can I safely remove from my tapered jeans?
A1: You can remove as much length as needed to achieve your desired fit. However, it’s crucial to measure carefully and remove fabric gradually. It’s best to aim for slightly longer than you think you need, as you can always shorten them more if necessary. Never remove more than an inch or two at a time without re-trying them on.
Q2: Will hemming my jeans make them tighter?
A2: Hemming itself only affects the length, not the width or fit


