


Quick Summary: Learn how to perfectly hem your tapered jeans using Oxyclean for a clean finish. This guide breaks down the simple steps, tool list, and tips to achieve a professional look right at home, ensuring your jeans fit just right without any fuss.
How To Hem Tapered Jeans: Essential Oxyclean Guide
Are your favorite tapered jeans a bit too long, dragging on the floor and looking a little sloppy? It’s a common problem, but fixing it doesn’t have to be complicated or expensive. You don’t need to be a sewing whiz to get a clean, professional hem. We’ll walk through a straightforward method, step-by-step, combining clear instructions with a touch of pre-treatment magic from Oxyclean to ensure a fresh finish.
This guide is designed for anyone. We’ll cover what you’ll need, how to measure and cut, and the actual hemming process. By the end, you’ll have a perfectly fitted pair of tapered jeans ready to wear, looking just the way you want them.
Why Hemming Tapered Jeans Matters

Tapered jeans have a specific silhouette – they fit closely around the calves and ankles. When they’re too long, this taper can be lost, making the jeans look bulky and ill-fitting. A proper hem restores the intended shape, enhancing the style of the jeans and making them more comfortable to wear anywhere, from casual outings to slightly dressier occasions. Plus, a well-hemmed pair simply looks more put-together.
Before You Start: The Oxyclean Advantage

While hemming is a sewing task, incorporating Oxyclean into your preparation can offer a subtle but welcome benefit. Before you even pick up scissors, a quick soak or spot treatment with Oxyclean can help brighten the denim and ensure that any minor stains or dinginess are addressed. This isn’t strictly necessary for the hemming technique itself, but it provides an opportunity to refresh your jeans while you’re working on them, ensuring they look their best with their new, perfect length.
Oxyclean is a versatile oxygen-based cleaner that helps remove stains and brighten fabrics. For this purpose, we’re using it as a preparatory step to ensure your jeans are as clean as possible before you start the hemming process. You can use it for a pre-wash treatment or even a targeted spot clean if you notice any areas that need extra attention. You can find out more about its general uses at the official Oxyclean usage guide.
Essential Tools and Materials

Gathering the right tools makes the process much smoother. Here’s what you’ll need to hem your tapered jeans:
- Your Tapered Jeans: Of course!
- Fabric Scissors: Sharp scissors are crucial for a clean cut. Fabric scissors designed for cloth will give you the best results.
- Measuring Tape or Ruler: For accurate measurements of the desired length.
- Fabric Chalk or a Disappearing Ink Pen: To mark your cutting line.
- Straight Pins: To hold the hem in place while sewing.
- Iron and Ironing Board: To press creases and prepare the fabric.
- Sewing Machine (Recommended) or Needle and Thread: For creating the new hem. A sewing machine will be faster and more durable.
- Thread: Choose a color that closely matches your jeans.
- Oxyclean (Optional): For pre-treating or freshening up your jeans.
- A Small Bowl and Water: If using Oxyclean for a spot treatment.
Step-by-Step Guide to Hemming Tapered Jeans

Follow these simple steps to give your tapered jeans the perfect length.
Step 1: Prepare Your Jeans with Oxyclean (Optional)
If you choose to use Oxyclean, this is the time. For a general freshening, you can add Oxyclean to your usual laundry detergent when washing your jeans. If you want to spot-treat a specific area or give a quick boost to the fabric’s brightness, mix a small amount of Oxyclean powder with water in a bowl to form a paste. Apply the paste to the area you want to treat, let it sit for a few minutes (check product instructions), then rinse thoroughly before proceeding. Ensure the jeans are completely dry or at least damp, but not saturated, for the next steps.
Step 2: Try On and Measure for the New Length
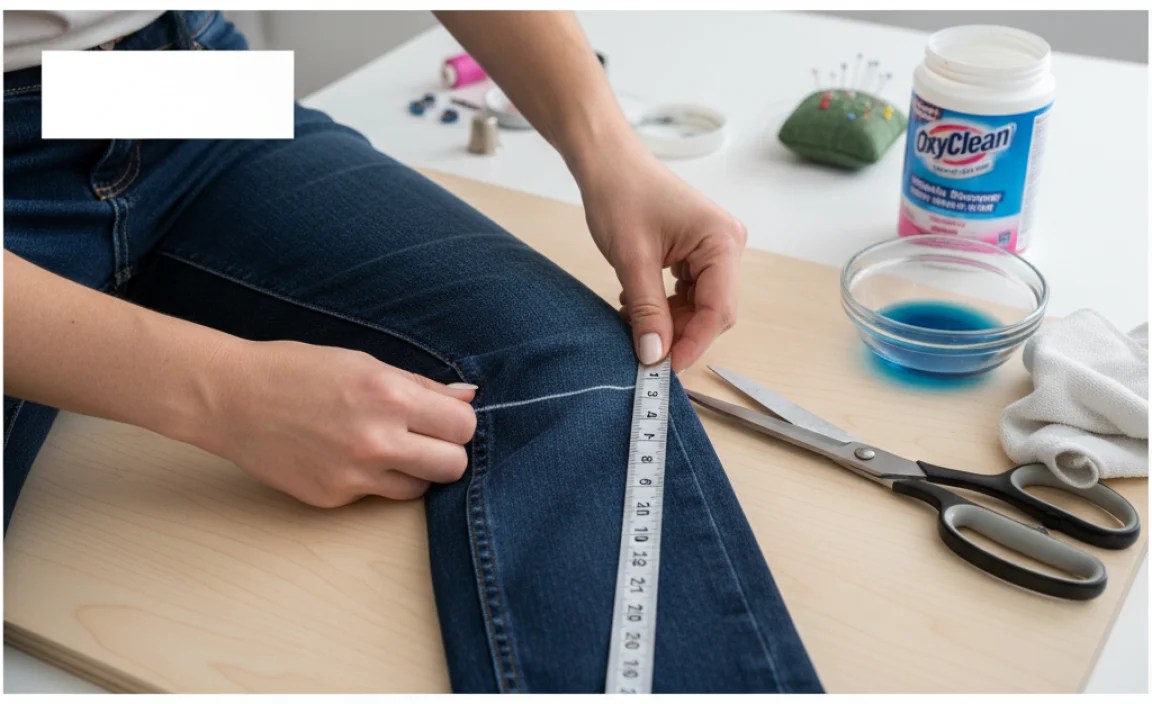
Wearing the shoes you typically wear with your tapered jeans is critical for accurate hemming. Stand in front of a mirror and put on the jeans. Smooth them down and observe where they are currently hitting your footwear. Decide on the desired length. You want them to end just above the shoe or at a point that complements the tapered silhouette without bunching or dragging. Use your fabric chalk or pen to mark where you want the bottom edge of the new hem to sit. A good rule of thumb for tapered jeans is to have them end right at the top of your shoe or even slightly above to showcase the taper.
Step 3: Mark the Cut Line
Once you’ve marked the desired finished hem position, you need to account for the amount of fabric you’ll fold over to create the new hem. A standard hem allowance for jeans is about 1 to 1.5 inches. Take off the jeans and lay them flat on a clean surface. From your initial mark (the desired bottom edge), measure down 1 to 1.5 inches and make a new, parallel line all the way around the leg. This second line is where you will actually cut. Ensure this line is straight and consistent around the entire leg opening.
Tip: For a more precise cut, use a ruler or a T-square to ensure your marking line is perfectly perpendicular to the inseam and outseam.
Step 4: Cut Off the Excess Fabric
Using your sharp fabric scissors, carefully cut along the second line you marked (the one 1 to 1.5 inches down from your desired finished length). Try to make the cut as straight and even as possible. If you’re concerned about accuracy, you can pin the fabric layers together along the line before cutting to help keep things steady.
Tip: Cut one leg at a time to avoid mistakes. Once one leg is cut and ready, you can use it as a guide to cut the second leg to the exact same length.
Step 5: Prepare the New Hem
Now, take the edge of the fabric you just cut and fold it upwards towards the inside of the jeans, aligning it with the original line you marked for your desired finished hem. This fold should be about 0.5 to 1 inch wide. Press this fold firmly with an iron. This creates the first crease of your hem. Then, fold this creased edge up again by the same amount (0.5 to 1 inch), so the raw edge is tucked inside the fold. Press this second fold firmly with your iron. You should now have a clean, double-folded hem of the desired width, with the raw edges neatly concealed.
Tip: For a very clean finish, especially with thicker denim, you can trim a little bit of the excess fabric from the raw edge before making the second fold. This is called “selvaging” the hem and reduces bulk.
Step 6: Pin the Hem in Place
With the hem folded and pressed, secure it in place using straight pins. Insert the pins perpendicular to the folded edge, spacing them about every 2-3 inches. Make sure the pins go through all layers of the fabric and hold the hem snugly against the leg of the jeans. This will keep everything in place for sewing.
Step 7: Sew the New Hem
This is where you create the permanent new hem. You have two main options:
Using a Sewing Machine (Recommended):
- Thread your sewing machine with thread that matches your jeans.
- Set your machine to a straight stitch. A medium stitch length (around 2.5 mm) is usually good for denim.
- Start sewing at a seam (like the inseam or outseam) to hide the beginning of your stitch.
- Sew as close to the folded edge as possible (about 1/8 inch from the bottom).
- Sew all the way around the leg, carefully guiding the fabric and removing pins as you go.
- When you reach the starting point, backstitch a few times to secure the stitch.
- Trim any excess threads.
By Hand:
- Thread a needle with your matching thread.
- Use a sturdy stitch like a backstitch or a hemming stitch for durability.
- Start at a seam and work your way around the leg, making small, even stitches.
- Try to catch just a small amount of fabric with each stitch to keep the hem neat.
- When you reach the beginning, tie off the thread securely with a knot.
- Trim any excess threads.
For an Authentic Look: If you want to preserve the original look of the hem, you can carefully remove the original hem stitching and fabric, then reattach your new hem using the original stitch holes as a guide. This is more advanced and often unnecessary for a clean, modern look.
Step 8: Finishing Touches
Once sewn, remove all the pins. Give the new hem a final press with your iron to ensure it lies flat and crisp. You might want to turn the jeans inside out and press from the inside as well, and then press the outside of the hem for a sharp finish. Check for any loose threads and snip them away.
Measuring and Cutting: A Visual Guide
Correctly measuring and cutting is foundational to a good hem. Here’s a quick breakdown of how the measurements should align:
| Measurement Point | Description | Action |
|---|---|---|
| Original Jean Bottom | The current, too-long edge of your jean leg. | Keep for reference. |
| Desired Finished Hem Line | Where you want the new bottom edge of your jeans to be. | Mark directly on the jean leg. |
| Cut Line | The line you will cut along; it’s the hem allowance below the desired finished hem line. | Mark 1 to 1.5 inches below the desired finished hem line. |
| Fold Line 1 | The line along which you make the first fold (folding the cut edge up). | This is the line for your desired finished hem. |
| Fold Line 2 | The line along which you make the second fold (tucking the first fold up). | This is the line where you sew. |
Choosing the Right Hem Type
While a simple double-folded hem is the most common for a clean finish, other options exist:
- Plain Hem: This is what we’ve described – folding the fabric twice, raw edge hidden, and stitching. It’s durable and looks neat.
- Rolled Hem: Best for lighter fabrics, involves rolling the edge very tightly and stitching. Less common for sturdy denim.
- Original Hem: Trying to save the original factory hem. This involves cutting above the original hem, folding the fabric up inside, and reattaching the original hem strip. This is a more advanced technique that preserves the original look but can add bulk.
For tapered jeans, the plain, double-folded hem offers a clean, modern look that complements the silhouette without adding unnecessary bulk. It’s beginner-friendly and provides excellent durability.
Troubleshooting Common Hemming Issues
Even with the best intentions, you might run into a few snags. Here’s how to handle them:
- Uneven Hem: If you notice it’s uneven after sewing, you can carefully go back, snip away any excess fabric, re-press, and re-stitch.
- Stretched Fabric: Denim can stretch, especially when cut. If a leg seems stretched out of shape after hemming, a gentle steam iron without pulling might help it relax back.
- Puckering Stitches: This often happens if the tension on your sewing machine is off. Check your machine’s manual for adjusting tension. If sewing by hand, ensure your stitches are even and not too tight.
- Thread Breaking: Use a strong needle appropriate for denim (a denim needle for machines) and good quality thread.
How Oxyclean Enhances Denim Care
While not directly involved in the sewing process, Oxyclean is a fantastic product for general denim care. Its oxygen-based formula works by releasing oxygen when mixed with water, creating tiny bubbles that help lift and break down stains and dirt. This makes it ideal for:
- Pre-treating tough stains before a regular wash.
- Brightening whites and colors in denim that might have faded over time.
- Freshening up denim that doesn’t have obvious stains but needs a pick-me-up.
Always follow the product instructions for mixing and application, and be sure to rinse thoroughly to remove all residue from your garments.
Frequently Asked Questions (FAQ)
Q1: Can I hem tapered jeans without a sewing machine?
Yes, absolutely! While a sewing machine makes it faster and often more durable, you can achieve a great hem by hand using a strong stitch like a backstitch. It just takes a bit more patience.
Q2: How much fabric should I leave for the hem?
For most jeans, leaving 1 to 1.5 inches of fabric for the hem allowance is standard. This allows for a clean double fold that conceals the raw edge and provides enough material for a secure stitch.
Q3: What if I cut too short?
If you accidentally cut too short, you have a couple of options. You can try to unpick your hem and add a strip of matching fabric to the bottom to extend it, though this can be challenging to make look seamless. Alternatively, embrace the shorter length or use the pair for shorts!
Q4: Do I need to wash my jeans before hemming?
It’s a good idea to wash and dry your jeans before hemming to account for any shrinkage that might occur. This ensures your new hem will maintain its length after future washes.
Q5: How do I make the hem look like the original?
To mimic the original hem, you’d typically salvage the original thick seam at the bottom of the leg. This involves carefully unpicking the original hem, cutting above it, folding the new length up, and then reattaching the original hem strip. This is more advanced and can add significant bulk.
Q6: Is Oxyclean safe for all denim colors?
Oxyclean is generally safe for most colors. However, always test on an inconspicuous area first, especially with brightly colored or very dark denim, to ensure it doesn’t cause any fading or discoloration. For this guide, we’re using it as an optional pre-wash step, not a soak for the entire garment before cutting.
Conclusion
Hemming your tapered jeans is a rewarding DIY project that can dramatically improve their fit and appearance. By carefully measuring, cutting, and sewing, you can achieve a professional-looking result without needing to visit a tailor. Remember the optional but helpful step of using Oxyclean to ensure your jeans are fresh and bright before you begin. With this straightforward guide, you’re well-equipped to tackle hemming and enjoy perfectly fitted jeans that complement your style.
.lwrp.link-whisper-related-posts{
margin-top: 40px;
margin-bottom: 30px;
}
.lwrp .lwrp-title{
}.lwrp .lwrp-description{
}
.lwrp .lwrp-list-container{
}
.lwrp .lwrp-list-multi-container{
display: flex;
}
.lwrp .lwrp-list-double{
width: 48%;
}
.lwrp .lwrp-list-triple{
width: 32%;
}
.lwrp .lwrp-list-row-container{
display: flex;
justify-content: space-between;
}
.lwrp .lwrp-list-row-container .lwrp-list-item{
width: calc(25% – 20px);
}
.lwrp .lwrp-list-item:not(.lwrp-no-posts-message-item){
max-width: 150px;
}
.lwrp .lwrp-list-item img{
max-width: 100%;
height: auto;
object-fit: cover;
aspect-ratio: 1 / 1;
}
.lwrp .lwrp-list-item.lwrp-empty-list-item{
background: initial !important;
}
.lwrp .lwrp-list-item .lwrp-list-link .lwrp-list-link-title-text,
.lwrp .lwrp-list-item .lwrp-list-no-posts-message{
}@media screen and (max-width: 480px) {
.lwrp.link-whisper-related-posts{
}
.lwrp .lwrp-title{
}.lwrp .lwrp-description{
}
.lwrp .lwrp-list-multi-container{
flex-direction: column;
}
.lwrp .lwrp-list-multi-container ul.lwrp-list{
margin-top: 0px;
margin-bottom: 0px;
padding-top: 0px;
padding-bottom: 0px;
}
.lwrp .lwrp-list-double,
.lwrp .lwrp-list-triple{
width: 100%;
}
.lwrp .lwrp-list-row-container{
justify-content: initial;
flex-direction: column;
}
.lwrp .lwrp-list-row-container .lwrp-list-item{
width: 100%;
}
.lwrp .lwrp-list-item:not(.lwrp-no-posts-message-item){
max-width: initial;
}
.lwrp .lwrp-list-item .lwrp-list-link .lwrp-list-link-title-text,
.lwrp .lwrp-list-item .lwrp-list-no-posts-message{
};
}


