


Quick Summary: Learn how to perfectly hem wide leg jeans without a washing machine using simple tools and techniques. This guide provides clear, step-by-step instructions and practical tips for achieving a professional look at home, ensuring your favorite denim fits just right.
How To Hem Wide Leg Jeans Without Washing Machine: Your Essential Guide

Ever bought a pair of fabulous wide leg jeans only to find they’re just a tad too long? It’s a common frustration, especially when you need them to look sharp for an outing and don’t have time for a wash cycle to potentially alter the fit. Don’t worry, hemming your wide leg jeans at home, even without a washing machine, is completely achievable. This guide will walk you through everything you need to know, step-by-step, so you can get that perfect length and feel confident in your updated denim.
We’ll cover the tools you’ll need, precise measuring techniques, and methods for a clean, durable hem that looks like it was done by a pro. Get ready to transform your jeans and enjoy a perfect fit, no laundry required!
Why Hemming Your Wide Leg Jeans is Worth It

Wide leg jeans are a fantastic fashion staple, offering comfort and style. However, their voluminous cut can sometimes be tricky with length. A hem that’s just an inch or two too long can cause your jeans to drag on the floor, pick up dirt, and look messy. This not only detracts from the overall look but can also damage the denim hem itself.
Hemming them yourself offers several advantages:
- Perfect Fit: Achieve the exact length you desire, whether you want them to just graze your shoes or sit perfectly on a heel.
- Cost Savings: Avoid paying for professional alterations, saving money for more style updates.
- Convenience: Make adjustments on your own schedule, without needing to plan a trip to a tailor or wait for a wash cycle.
- Customization: You can choose the exact style of hem you prefer, maintaining the original look or opting for a fresh finish.
Essential Tools for Hemming Wide Leg Jeans

Before you start, gather these essential tools. Having everything ready will make the hemming process smooth and efficient.
| Tool | Purpose | Why It’s Important |
|---|---|---|
| Sharp Fabric Scissors or Rotary Cutter & Mat | Cutting the excess fabric accurately. | A clean, precise cut is crucial for a professional-looking hem. Dull scissors can snag and create an uneven edge. |
| Measuring Tape or Ruler | Measuring the desired length. | Ensures you cut the fabric to the exact length needed. |
| Fabric Marker or Chalk | Marking the cut line and fold lines. | These washable or erasable marks guide your cutting and sewing. |
| Straight Pins | Securing folded fabric. | Holds the hem in place while you sew, ensuring it doesn’t shift. |
| Iron and Ironing Board | Pressing folds and seams. | Creates crisp, flat folds for accurate sewing and a neat finish. |
| Sewing Machine or Hand-Sewing Needle | Securing the hem permanently. | A sewing machine is faster and stronger, but a needle and thread can achieve a great result for hand diners. |
| Matching Thread | Sewing the hem. | Using thread that matches your jeans will make the stitches less visible, contributing to a professional look. |
| Seam Ripper (Optional but Recommended) | Removing the original hem if you want to preserve it. | Useful if you plan to reattach the original finished hem for an authentic look. |
| Darning Needle (for hand sewing) | For hand-sewing the hem. | A sturdy needle designed for sewing thicker fabrics like denim. |
Step-by-Step Guide: How to Hem Wide Leg Jeans

Follow these steps carefully to achieve a perfect hem on your wide leg jeans without needing to wash them first. The key is careful measurement and preparation.
Step 1: Wear Your Jeans and Determine the Desired Length
This is the most critical step. Put on the jeans you want to hem and wear the shoes you plan to typically wear with them. This helps you visualize the final length accurately. Stand in front of a mirror and observe where the current hem falls. Decide how much you want to shorten them. A good rule of thumb for wide leg jeans is to have them end about half an inch to an inch above the floor, depending on your shoe height – they should never drag.
Pro Tip: If you’re unsure, start by marking them a little longer than you think you need. You can always trim more off, but you can’t add it back!
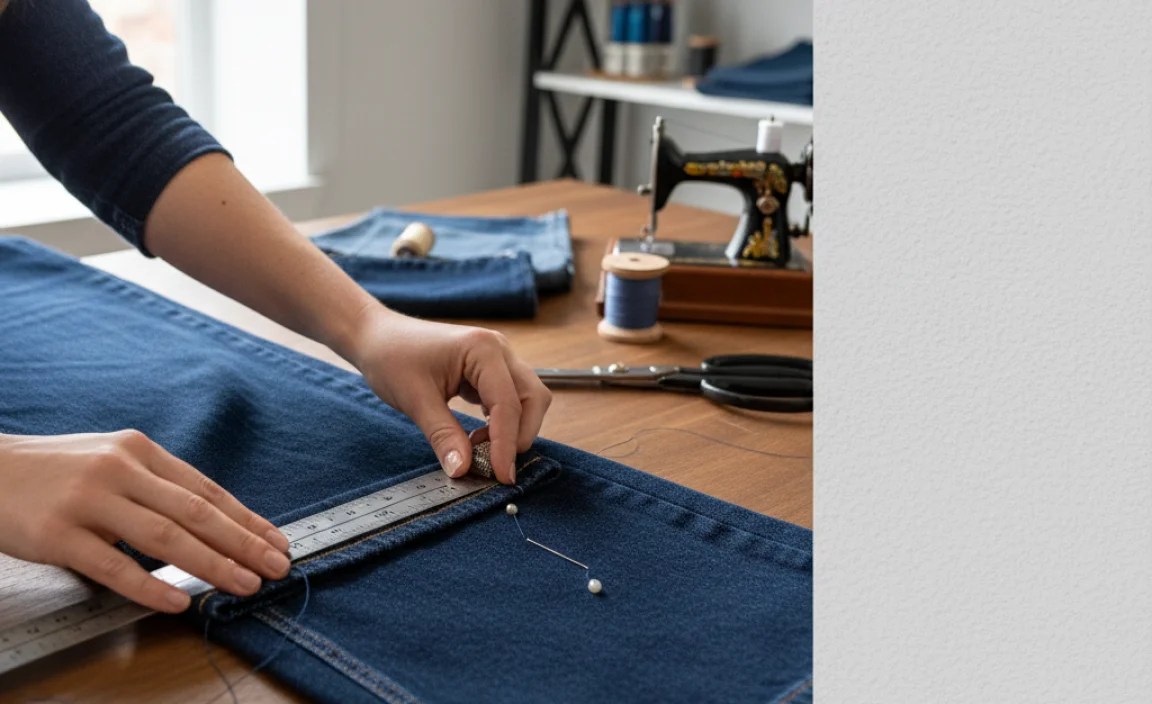
Step 2: Mark the New Hemline
While wearing the jeans, use your fabric marker or chalk to mark where you want the new bottom edge of the jeans to be. Make small marks on the inner seam, front, and back of each leg. It’s often easiest to do this with a helper, but you can also do it yourself by carefully holding the fabric and marking.
Take off the jeans and lay them flat on a clean surface, like a table or the floor. Smooth out any wrinkles. You’ll see the marks you made. You now need to decide how much fabric you want to fold up for the new hem allowance. For most denim, a 1-inch to 1.5-inch allowance is standard. This is the fabric that will be folded up and sewn.
Using your ruler and fabric marker, draw a straight line parallel to the bottom edge, 1 inch (or your chosen allowance) above your original marked hemline. This line represents where the folded edge of your new hem will sit. Now, measure down from this new hemline mark (your folded edge line) by the amount you want to cut off. For example, if you want to shorten them by 2 inches and are using a 1-inch hem allowance, you’ll draw another line 2 inches below your original mark. This second line is your cutting line.
Example Measurement Scenario:
- Original Jean Length: X inches
- Desired New Jean Length: Y inches
- Amount to Cut Off: X – Y inches (Let’s say this equals 2 inches)
- Hem Allowance (fabric folded up): 1 inch
- Total Fabric to Remove = Amount to Cut Off + Hem Allowance = 2 inches + 1 inch = 3 inches
- So, you would cut 3 inches off the bottom of each leg below the original hem. The remaining 1 inch will be folded up to create the new hem.
Step 3: Cut the Excess Fabric
Once you have your cutting line clearly marked around the entire circumference of each leg, it’s time to cut. Use your sharp fabric scissors or rotary cutter. Cut as straight as possible along the marked cutting line. Ensure you are cutting through both layers of the denim if the leg is flat, or follow the curve of the leg if it’s still tubular. It’s best to cut one leg at a time to maintain accuracy.
Important: If your wide leg jeans have a finished hem that you want to replicate (e.g., a slightly frayed or decorative edge), you might want to use a seam ripper to carefully remove the original hem first, and then attach it to the newly shortened leg. This is a bit more advanced but preserves the original look.
Step 4: Prepare the New Hem (Folding)
With the excess fabric removed, lay one leg flat. Fold the bottom edge up towards the inside of the leg along the hem allowance line you marked earlier (your line that is 1 inch from the raw edge). A 1-inch hem allowance is a good standard for denim. Press this fold firmly with your iron. This creates a crisp fold that will serve as the top edge of your new hem.
Next, you’ll fold this again. Fold the newly pressed edge up once more, so that the raw edge is now enclosed within the fold. This second fold should align with the first fold line you pressed (the line that was originally 1 inch from the raw edge). Press this second fold very firmly. You should now have a double-folded hem of about 1 inch. You can secure this fold with straight pins, placing them about every 2-3 inches along the edge to keep it in place.
Step 5: Secure the Hem – Sewing Options
Now it’s time to permanently attach the folded hem. You have two main options: sewing machine or hand sewing.
Option A: Using a Sewing Machine
This is the fastest and most durable method. Thread your sewing machine with a strong needle and thread that matches your jeans. Set your stitch length to a medium setting (around 2.5). Place the pinned leg under the sewing machine’s presser foot, aligning the fabric so the needle will sew just along the top folded edge of the hem (about 1/8 inch from the top folded edge). Backstitch a couple of stitches at the beginning and end for extra security.
Carefully guide the fabric through the machine, ensuring the layers remain flat and the hem doesn’t twist. Continue sewing all the way around the leg. Overlap your stitches by about half an inch with where you started, and backstitch again to secure the seam.
- Beginner Tip: Practice on a scrap piece of denim first to get a feel for sewing through the thick fabric and to test your stitch settings.
Option B: Hand Sewing the Hem
If you don’t have a sewing machine, or prefer a more traditional approach, hand sewing is perfectly effective. Use a strong, sharp darning needle and matching thread. It’s best to use a double strand of thread for added strength. Knot the end of your thread securely.
There are a couple of good hand stitches for hemming denim:
- The Blind Hem Stitch (or Slip Stitch): This stitch is nearly invisible from the outside. Working from the inside of the leg, bring your needle up through the fold of the hem. Take a tiny stitch in the body of the jean fabric just above the folded edge, then bring your needle back down through the fold of the hem. Continue this process, taking small, evenly spaced stitches.
- The Running Stitch (followed by a whip stitch for reinforcement): A simple forward stitch can be used. Insert the needle and pull it through, then move forward about 1/4 inch to 1/2 inch and insert it again. Once you’ve gone all the way around, you can go back over these stitches with a whip stitch, wrapping the thread around each stitch for added strength and to help keep the hem flat against the leg.
Whichever stitch you choose, aim for small, consistent stitches. Knot your thread securely at the end when you finish.
For both machine and hand sewing, ensure you catch enough of the jean fabric with your stitches to make the hem secure and prevent it from hanging loose later. The stitches should go through the top layer of the folded hem and into the main body of the jean where the fold is.
Step 6: Finishing Touches
Once you’ve sewn the hem, remove all the pins. Press the hemmed area one last time with your iron. This helps to set the stitches and give a crisp, finished look. Trim any loose threads. Try on your newly hemmed jeans to admire your work!
Replicating Original Hems: A Deeper Dive
For many, the original hem provides a unique aesthetic – think of those slightly frayed or contrast-stitched edges. If you’re aiming for that seamless, factory-finished look, you’ll need to carefully remove the original hem before shortening.
How to Remove an Original Hem
Lay the jeans flat. Identify the seam that holds the original hem to the leg. Using a seam ripper, carefully and slowly pick away at the stitches holding the hem. Work your way around the entire circumference of the leg. Be patient; rushing can damage the fabric. Once all stitches are removed, the original hem should detach. You may need to gently press it to lay flat.
Reattaching the Original Hem
After you’ve followed steps 1-3 to measure, mark, and cut your jeans to the new, shorter length, you’ll have a raw edge at the bottom of the leg. Now, instead of folding up a new hem, you’ll reattach the original finished hem. You can do this by:
- Pinning: Align the raw edge of the shortened leg with the inside edge of the original hem. Pin them together securely, ensuring the original hem is facing the correct direction (usually outward).
- Sewing: This is the trickiest part. You’ll want to sew as close as possible to where the original hem was attached to the leg. This might involve hand sewing to mimic the original stitch pattern. Using a sewing machine here can be challenging due to the multiple layers and the desire to match original stitching. The goal is to secure the original hem back onto the shortened leg without it looking like an addition.
This method requires precision but offers the most authentic result if you love the original hem detail. For a quick and clean new hem, the double-fold method described earlier is usually sufficient and much simpler.
Maintaining Your Hem
Once your jeans are perfectly hemmed, you’ll want them to stay that way. Since we’re hemming without a wash, the fabric is still in its ‘pre-wash’ state. When you eventually do wash your jeans:
- Wash Inside Out: Always turn your jeans inside out before washing. This protects the outer fabric and the hem from excessive wear and tear.
- Gentle Cycle: Use a gentle or delicate wash cycle with cold water. This reduces stress on the seams and fabric.
- Air Dry: The best way to dry denim is to air dry it. Hang your jeans from the waistband or lay them flat. Avoid high heat from a dryer, which can shrink denim and weaken threads over time.
- Check Stitches: Periodically check the hem stitches, especially if you hand-sewed. If any threads loosen, re-stitch them promptly to prevent the hem from unraveling.
Following these washing and drying practices will help preserve the integrity and appearance of your newly hemmed wide leg jeans.
When to Consider Professional Alterations
While home hemming is practical and satisfying, there are times when seeking professional help is the better option:
- Extremely Delicate Denim: Some high-end or vintage denim can be fragile. A professional tailor has the tools and experience to handle these materials without causing damage.
- Complex Hem Styles: If your jeans have intricate details like heavy embellishments, elaborate stitching patterns, or a very specific drape that you don’t want to alter, a tailor is best.
- Wanting a Factory Finish: While we aim for a professional look, a tailor has specialized machines and techniques to perfectly replicate a factory-made hem, especially for very structured or precise finishes.
- Significant Length Adjustments: For very large alterations, or if the jeans have a complex cut (like bell bottoms that need to be perfectly reconstructed), a tailor’s expertise is invaluable.
- Unfamiliarity with Sewing: If you’re completely new to sewing and not confident in your abilities, a professional alteration is a sure way to get flawless results, albeit at a cost.
For most standard wide leg jeans needing a simple length adjustment, the DIY method is very effective. Resources like the National Library of Medicine’s exhibit on sewing can provide historical context and illustrate the enduring value of garment care and alteration.
Frequently Asked Questions (FAQ)
Q1: Can I hem wide leg jeans without a sewing machine?
Yes, absolutely! You can achieve a durable and neat hem by hand sewing using a strong needle and matching thread. A blind hem stitch or a reinforced running stitch works well for denim.
Q2: How much fabric should I leave for the hem allowance?
For most denim, a hem allowance of 1 inch to 1.5 inches is recommended. This provides enough fabric to fold for a clean finish and ensures durability.
Q3: My wide leg jeans are already quite wide. Will hemming them make the leg look narrower?
As long as you are only adjusting the length and not the width of the leg, the original wide leg silhouette will be maintained. The hemming process focuses on the vertical length.
Q4: What kind of thread should I use for hemming jeans?
It’s best to use a strong polyester or cotton-polyester blend thread that closely matches the color of your jeans. For a visible stitch that mimics original denim construction, thicker “jean thread


