


Quick Summary
Learn how to perfectly hem your bootcut jeans with ease, ensuring a clean finish that complements your footwear. This guide covers simple steps for a professional look, plus a handy tip for tackling common denim stains.
Jeans are a wardrobe staple, but getting the length just right can be tricky. Bootcut jeans, in particular, need a precise hem to avoid dragging or looking too short. Don’t worry; hemming them yourself is easier than you think, and it can save you a trip to the tailor. We’ll walk you through the process step-by-step, making sure your bootcut jeans look fantastic and fit like they were made for you. Plus, we’ve got a great tip for keeping them looking fresh by tackling those inevitable denim disasters.
Why Hemming Your Bootcut Jeans Matters

Bootcut jeans are designed to subtly flare out at the ankle, balancing your silhouette and working well with various shoe styles. The perfect hem length is crucial for this. Too long, and they’ll bunch up around your shoes, looking messy and potentially getting damaged. Too short, and the bootcut silhouette is lost, making them appear awkwardly proportioned. A proper hem ensures your jeans drape beautifully over your footwear, from sneakers to heels, creating a polished and put-together look.
Beyond aesthetics, a well-hemmed pair of jeans feels more comfortable. You won’t be tripping over excess fabric, and your jeans will maintain their intended shape. For many, the cost of professional hemming can add up, especially if you frequently buy new denim. Learning to hem them yourself is an empowering skill that saves money and gives you control over your wardrobe.
Getting Started: What You’ll Need
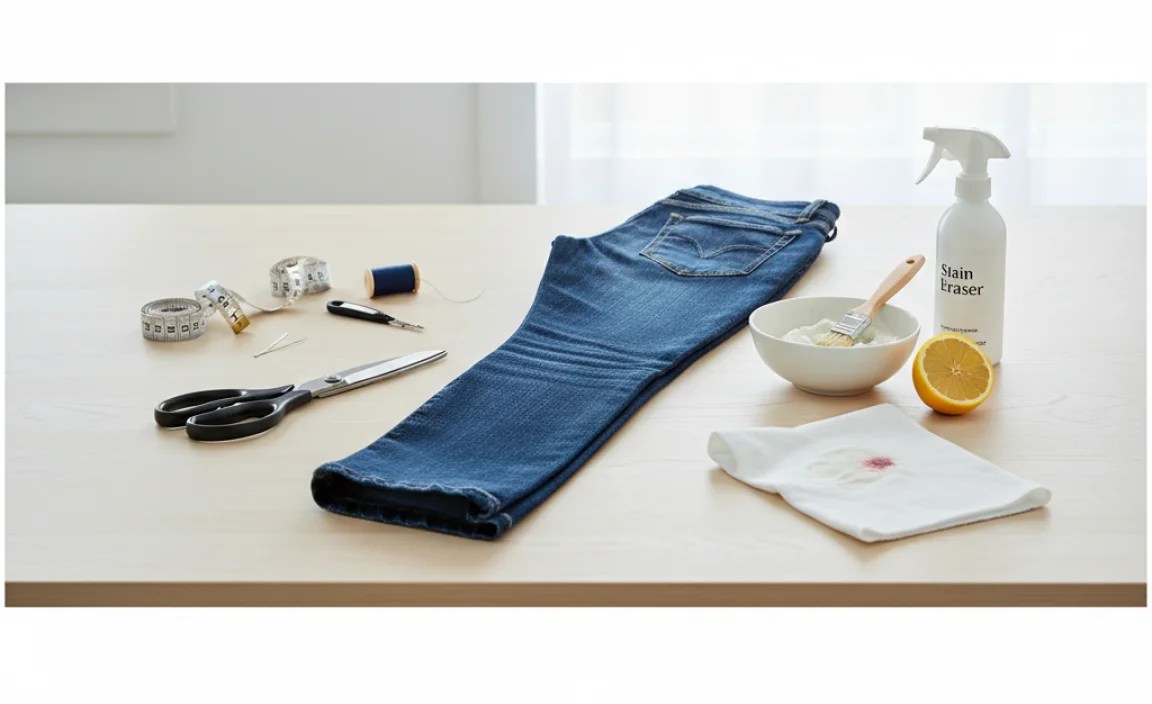
Before we dive into the steps, let’s gather your supplies. Having everything ready will make the process smooth and efficient.
- Your Bootcut Jeans: The star of the show! Make sure they are clean.
- Measuring Tape: Essential for accurate length measurement.
- Fabric Scissors: Sharp scissors designed for fabric will give you a clean cut.
- Fabric Marker or Tailor’s Chalk: To mark your hem line.
- Straight Pins: To hold the folded hem in place while you work.
- Sewing Machine (Optional but Recommended): For a durable and professional-looking stitch. Hand-sewing is also an option.
- Thread: Choose a color that matches or complements your jeans’ original stitching.
- Iron and Ironing Board: To press creases and secure the hem.
- OxiClean (or similar oxygen bleach): For tackling those stubborn stains.
Step-by-Step Guide to Hemming Bootcut Jeans

Let’s get your bootcut jeans to the perfect length. Follow these steps carefully for a great result.
Step 1: Measure and Mark
First, determine the desired length. Try on your jeans with the shoes you typically wear with them. Stand in front of a mirror and let them fall naturally with the shoe. Use your measuring tape to find the point where you want the hem to end. Often, this is just grazing the top of your shoe, or about 1/4 to 1/2 inch off the floor. Once you’ve found the sweet spot, use your fabric marker or tailor’s chalk to make a small mark on the inside seam of each leg. For bootcut jeans, it’s crucial to measure from the crotch seam down the outseam andinseam as both can differ due to the flare.
Pro Tip: It’s often easier to measure and mark starting from the inseam. Lay your jeans flat, smooth out the fabric, and measure from the crotch down to your desired length on the inseam. Mark this point. Then, transfer this measurement to the outseam. Remember, the outseam will need to be slightly longer than the inseam due to the leg’s shape.
Step 2: Fold and Pin the Hem
Once you have your marks, it’s time to create the fold. You’ll want to create a double fold for a clean, durable hem that won’t fray easily. A common total hem allowance for jeans is about 1 to 1.5 inches. Fold the bottom edge of the jean leg up about 1/2 inch towards the inside of the leg, and press it with your iron. Then, fold it up again by another 1/2 to 1 inch, enclosing the raw edge. Pin this fold securely in place all the way around the leg.
Ensure that the fold is even and that the original hem of the jeans is tucked inside. If you’re trying to maintain the original look, you might choose to cut off the excess fabric first, leaving about 1 to 1.5 inches for your double fold. If you want to keep the original hem, you’ll carefully measure, then fold up the excess fabric below the original hem and stitch through all layers.
Step 3: Sew the Hem
Now it’s time to secure the hem. If you’re using a sewing machine, set it up with a strong needle and thread that matches your jeans. A denim needle is highly recommended for passing through the thick layers of fabric. Stitch as close to the top folded edge of your hem as possible, going all the way around the leg. Sew slowly and carefully, especially as you go over seams or thicker areas. It’s a good idea to backstitch at the beginning and end of your seam to secure it.
If Sewing by Hand: Use a strong stitch, like a backstitch, which mimics machine stitching and is very durable. Keep your stitches small and even for the neatest finish. You can also use a whipstitch or a blind hem stitch for a less visible line of stitching, though this might be less durable for denim.
Maintaining the Original Look: For a truly authentic finish, some people prefer to cut off the bottom hem, leaving about an inch for a fold-up, and then reattach the original hem. This is more advanced, but here’s a simplified approach: after determining height, cut off excess fabric, leaving 1.5 inches. Fold up 0.5 inches, then fold up another 1 inch, enclosing the raw edge. Then, stitch through all layers as close to the top edge of the folded hem as possible.
Step 4: Press and Finish
Once you’ve sewn the hem, remove all the pins. Press the hem firmly with your iron. This not only gives the hem a crisp, finished look but also helps set the stitches. You can press the hem flat on the inside or give it a slight outward press for a clean finish on the outside. Trim any stray threads for a polished appearance.
Turn your jeans right side out and admire your handiwork! Try them on with your chosen shoes to ensure the length is perfect.
The “Proven Stain Eraser” Secret: Tackling Denim Stains with OxiClean

Life happens, and denim can be prone to all sorts of mishaps. From grass stains to food splatters, knowing how to tackle them quickly can save your favorite jeans. For bootcut jeans, and denim in general, nothing beats the stain-fighting power of an oxygen-based cleaner like OxiClean. It’s gentle on colors while being tough on stains.
How to Use OxiClean for Denim Stains
This method is simple and effective for fresh or set-in stains. Always test on an inconspicuous area first if you’re concerned about the dye in your jeans.
- Identify the Stain: Determine what caused the stain if possible.
- Prepare the OxiClean Solution: In a bucket or sink, mix about 1/4 scoop of OxiClean powder with warm water. Stir until the powder is dissolved. For tougher stains, you can use a little more OxiClean or slightly hotter water, but always be mindful of your jeans’ fabric care instructions. Check the OxiClean usage guide for specific stain types and fabric recommendations.
- Pre-Soak the Stained Area: Submerge the stained portion of your jeans in the OxiClean solution. Ensure the entire stained area is fully covered. For tough, dried-on stains, you might want to let it soak for at least 1-6 hours, or even overnight.
- Scrub Gently (If Needed): For persistent stains, you can gently rub the fabric against itself or use a soft-bristled brush to work the solution into the stain. Avoid aggressive scrubbing, which can damage the fabric.
- Wash as Usual: After soaking, remove your jeans from the OxiClean solution and wash them in your washing machine as you normally would, using your regular laundry detergent. Wash them in the warmest water recommended for the fabric.
- Air Dry: It’s best to air dry your jeans after treating a stain. Check if the stain is completely gone before putting them in the dryer. The heat from a dryer can set a stain permanently if it hasn’t been fully removed. If the stain persists, repeat the OxiClean treatment.
OxiClean works by releasing oxygen when mixed with water, which helps to break down and lift stains from fabric fibers. It’s a color-safe bleach, making it a fantastic alternative to chlorine bleach for keeping your denim looking its best without causing fading.
For more information on fabric care and stain removal, consult resources like the Federal Trade Commission’s guide on garment care labels.
Troubleshooting: Common Hemming Issues and Solutions

Even with careful planning, you might encounter a few bumps along the road. Here are some common issues and how to fix them.
Uneven Hem Line
Problem: The folded hem isn’t straight all the way around.
Solution: If it’s slightly off, you can often fix this by carefully unpicking the stitches, re-pressing the fabric to create a straight fold, and re-pinning and re-stitching. For significant unevenness, you might need to trim a little more fabric to create a new, straight starting point.
Stitches Too Loose or Uneven
Problem: The stitching looks messy or is pulling the fabric.
Solution: For machine sewing, ensure your tension is set correctly and you’re using the right needle and thread. If hand-sewing, try to keep your stitches uniform in size and tension. You might need to unpick and re-sew the seam.
Hem Fraying Prematurely
Problem: The raw edge of the fabric is coming undone.
Solution: This usually means the raw edge wasn’t fully enclosed in the double fold or wasn’t secured properly. If you only left a small allowance, you might need to re-hem, leaving a bit more fabric for a sturdier finish. For a quick fix on existing fraying, you could try applying a fabric fray sealant along the edge.
Jeans Still Too Long After Hemming
Problem: You’ve hemmed them, but they’re still dragging.
Solution: Don’t panic! You can usually unpick the stitches and take up the hem a bit more. If you’ve already used up most of your fabric allowance for the double fold, you might only be able to take up an extra 1/4 to 1/2 inch. If you need to shorten them significantly, you might have to consider cutting off the hem and re-hemming with fresh folds, or even starting over if you cut too much initially.
Alternatives to Traditional Hemming
While the sewn hem is standard, there are other ways to achieve a finished hem on your bootcut jeans, depending on your desired look and skill level.
- Hem Tape (No-Sew Hemming): This is a fusible web that you iron between the folded fabric layers to create a bond. It’s a quick, no-sewing solution, ideal for a temporary fix or if you don’t have a sewing machine. The bond might not be as durable as stitching, especially with frequent washing.
- Fabric Glue: Similar to hem tape, fabric glue offers a no-sew option. Apply it to the folded edge and press to secure. Ensure you use a glue specifically designed for fabric, as craft glues can become stiff or wash out.
- Rolled or Cuffed Hem: Instead of a traditional fold, you can simply cuff your jeans. This is a stylish, casual look. For bootcut jeans, a double cuff can work well to add a bit of weight and structure to the hem, preventing it from looking flimsy. This is easily adjustable and casual.
- Distressed/Cut-Off Hem: For a more edgy, casual look, you can simply cut off the excess fabric and let the ends fray naturally. You can encourage fraying by washing the jeans after cutting. This requires no sewing at all.
Choosing the Right Hem for Your Bootcut Jeans
The best hemming method for your bootcut jeans depends on the style, occasion, and your personal preference. For a classic, polished look that works for everyday wear and dressier occasions, a double-folded, machine-sewn hem is the gold standard. It’s durable and looks professional.
If you’re looking for a quick fix or a temporary solution, hem tape is incredibly useful. It’s also great if you’re unsure about the final length and want to try before committing to sewing.
A rolled or cuffed hem offers a more relaxed, fashionable vibe and is easy to adjust if your footwear changes. This can be done with or without sewing, depending on how permanent you want it to be.
Finally, a cut-off or distressed hem is perfect for a laid-back, bohemian, or grunge aesthetic. It’s the easiest to achieve and requires no sewing skills whatsoever.
Table: Hemming Methods Compared
Here’s a quick comparison to help you decide:
| Method | Pros | Cons | Best For |
|---|---|---|---|
| Sewn Hem (Machine/Hand) | Durable, professional finish, secure. | Requires sewing skills/machine, takes time. | Classic look, everyday wear, long-term results. |
| Hem Tape (No-Sew) | Quick, easy, no sewing required. | Less durable, may fail with heavy washing, can sometimes create stiffness. | Temporary fixes, quick adjustments, beginners. |
| Fabric Glue (No-Sew) | Easy, no sewing required, strong bond if used correctly. | Can be messy, some glues stiffen fabric, specific fabric glues recommended. | Quick fixes, no-sew projects, when minimal flex is needed. |
| Rolled/Cuffed Hem | Stylish, casual, easily adjustable, no cutting beyond desired length needed. | Can sometimes look bulky, may unfold if not secured. | Casual outfits, trendy looks, adjustable length. |
| Cut-Off/Distressed Hem | Very easy, casual, edgy style, no sewing needed. | Can fray excessively, not suitable for all styles or occasions, permanent. | Bohemian, grunge, casual, or undone looks. |
The Importance of Fabric Care for Denim Longevity
Proper care extends the life and appearance of your jeans, especially after hemming or stain treatment. Denim is a sturdy fabric, but it’s not invincible. Washing less frequently can help preserve the color and integrity of the fibers. When you do wash, turn your jeans inside out. This protects the outer surface, especially dark washes, from fading and reduces abrasion on seams and any decorative elements.
Use cold water for washing, as hot water can cause shrinkage and fading. Opt for a mild detergent and avoid using fabric softeners, which can break down denim fibers over time and can also hinder the effectiveness of stain treatments like OxiClean.
Drying is another critical step. As mentioned, air drying is ideal for maintaining the fit and preventing heat damage. If you must use a dryer, use a low heat setting and remove the jeans while they are still slightly damp to finish air drying. This minimizes shrinking and stress on the fabric.
For detailed insights into denim care, consider resources like those provided by denim enthusiasts or manufacturers who offer extensive guides on preserving your jeans.
Frequently Asked Questions (FAQs)
1. How much fabric should I leave for hemming bootcut jeans?
For a clean, double-folded hem, leave about 1 to 1.5 inches of fabric below your desired hemline. This gives you enough material to create a neat fold that encloses the raw edge.
2. Can I hem bootcut jeans without a sewing machine?
Yes! You can achieve a successful hem using a sewing machine, hand-stitching, hem tape, or fabric glue. Hand-stitching provides a durable finish, while hem tape is a quick, no-sew option.
.lwrp.link-whisper-related-posts{
margin-top: 40px;
margin-bottom: 30px;
}
.lwrp .lwrp-title{
}.lwrp .lwrp-description{
}
.lwrp .lwrp-list-container{
}
.lwrp .lwrp-list-multi-container{
display: flex;
}
.lwrp .lwrp-list-double{
width: 48%;
}
.lwrp .lwrp-list-triple{
width: 32%;
}
.lwrp .lwrp-list-row-container{
display: flex;
justify-content: space-between;
}
.lwrp .lwrp-list-row-container .lwrp-list-item{
width: calc(25% – 20px);
}
.lwrp .lwrp-list-item:not(.lwrp-no-posts-message-item){
max-width: 150px;
}
.lwrp .lwrp-list-item img{
max-width: 100%;
height: auto;
object-fit: cover;
aspect-ratio: 1 / 1;
}
.lwrp .lwrp-list-item.lwrp-empty-list-item{
background: initial !important;
}
.lwrp .lwrp-list-item .lwrp-list-link .lwrp-list-link-title-text,
.lwrp .lwrp-list-item .lwrp-list-no-posts-message{
}@media screen and (max-width: 480px) {
.lwrp.link-whisper-related-posts{
}
.lwrp .lwrp-title{
}.lwrp .lwrp-description{
}
.lwrp .lwrp-list-multi-container{
flex-direction: column;
}
.lwrp .lwrp-list-multi-container ul.lwrp-list{
margin-top: 0px;
margin-bottom: 0px;
padding-top: 0px;
padding-bottom: 0px;
}
.lwrp .lwrp-list-double,
.lwrp .lwrp-list-triple{
width: 100%;
}
.lwrp .lwrp-list-row-container{
justify-content: initial;
flex-direction: column;
}
.lwrp .lwrp-list-row-container .lwrp-list-item{
width: 100%;
}
.lwrp .lwrp-list-item:not(.lwrp-no-posts-message-item){
max-width: initial;
}
.lwrp .lwrp-list-item .lwrp-list-link .lwrp-list-link-title-text,
.lwrp .lwrp-list-item .lwrp-list-no-posts-message{
};
}


